Thursday 29 February 2024

{How to} Enable or Disable a frequency cap for your Journey Dynamics 365 Customer Insights

Hello Everyone,


Today I am going to show how to enable or disable a frequency cap for your Journey.


Let's get's started.


The frequency settings is enabled by default for all journeys. So once the frequency cap settings are enabled globally, the message will be capped.


So the users who are editing rights in the Journey will be able to decide if the cap should be bypassed for a specific Journey.


How to bypass the frequency cap:


Login into Customer Insights


Go to the Journey and edit it and then click on the gear icon and you will see two options:


1. Apply frequency cap to this journey - skip commercial message if cap is reached.


2. Don't apply frequency cap to this journey.


That's it for today.


I hope this helps.


Malla Reddy Gurram(@UK365GUY)
#365BlogPostsin365Days

Wednesday 28 February 2024

{How to} Set Maximum frequency cap of email text messages push notifications on Dynamics 365 Customer Insights

Hello Everyone,


Today I am going to show how to set maximum frequency of Email, Text Message, Push Notification on Dynamics 365 Customer Insights.


Let's get's started.


Generally we don't set how many emails, text message, push notifications that we can deliver to the targetted customers.


Now with the Frequency Cap from the Customer Insights settings that will be set.


Lets see how we can set the CAP.


Login into Dynamics 365 Customer Insights.


Change to the Settings.


Then Click on Frequency Cap from Customer Engagement.


Maximum frequency per contact point.


You can define the maximum number of commercial messages your customers can receive per channel in Real-time Journeys. The recommended number varies greatly by brand and vertical.


That's it for today.


I hope this helps.


Malla Reddy Gurram(@UK365GUY)
#365BlogPostsin365Days


Tuesday 27 February 2024

Analyze aggregated sales activities using Copilot for Sales

Hello Everyone,


Today I am going to share my thoughts on analyze aggregrated sales activities on Copilot for Sales.


Let's get's started.


Certainly! Microsoft Copilot for Sales provides valuables insights and analysis for sales activities. Here  are the key details:


1. Business Value: 


This capability empowers sellers and sales managers by offering analysis and access to customer conversation and email data.


It enables informed decision-making, optimization of sales processes, efficient coaching of team members, and effective pipelines management.


Benefits include enhanced customer relationship management, competitive edge, performance tracking, resource allocation optimization, compliance assurance, and fostering a data - driven culture, ultimately driving revenue growth and customer satifaction.


2. Feature Details:


Integration: Seamlessly integrated into Microsoft 365 Chat, the Copilot for Sales add-in in Outlook, and the Copilot for Sales app in Teams.


Functionality: Addresses users, inquiries arising from customer conversations, including trending topics, areas with negative sentiment and comprehensive overviews of budget discussions from past interactions.


Insights: Elevate customer engagement by gaining valuable insights and fostering informed decision- making.


To leverage this functionality, ensure that Copilot for Sales and Copilot for Microsoft 365  are enabled. If you're interested, you can explore the Microsoft Copilot for Sales Dashboard(Preview), which provides an aggregated view of sales conversations, insights for coaching and quick access sales communication with AI-driven insights, content and recommendations.


That's it for today.

I hope this helps.

Malla Reddy Gurram(@UK365GUY)
#365BlogPostsin365Days


Monday 26 February 2024

{How to} Create Journey with Copilot Dynamics 365 Customer Insights

Hello Everyone,


Today I am going to show how to use Copilot to create a Journey in Dynamics 365 Customer Insights.


Let's get's started.


When you login into Dynamics 365 Customer Insights and try to create a Journey then a popup will appear on the screen.


You can ask Copilot with simple statement and send then Copilot will provide you with the Pre Journey created for you.


Lets say i have asked Copilot:


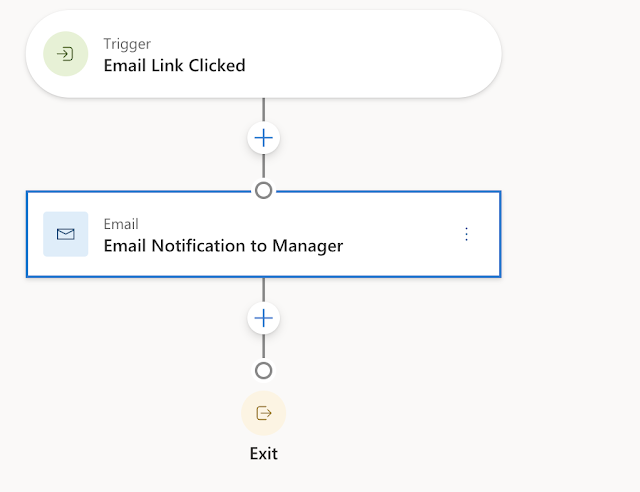
Send an Email to Account Manager when a customer clicks on Marketing Email.


Then it will asks for choose a trigger and Multiple types of audience found, choose one for the journey.

Choose trigger and types of audiences from the lookup and drop down.


Then click on Submit button.


Then preview will be displayed see below screenshot:


Once you are satisfied then click on the Create Journey.


Choose your criteria from  the left of the screen:

If you want to exclude by segements you can do so by lookup on the Exclude by segements lookup.


Repeat: You can set when journey should trigger when someone triggers this journey set like:

Immediately
Never
After


Schedule:

You can time zone.


Start date and end date.


Once you done your configuration you can click on SAVE AND PUBLISH the Journey.


That's it for today.


I hope this helps.

Malla Reddy Gurram(@UK365GUY)
#365BlogPostsin365Days


Sunday 25 February 2024

{How to } Manage client consent from leads and contacts forms in Dynamics 365 Customer Insights

Hello Everyone,


Today I am going to share my thoughts on manage client consents from leads and contacts forms(preview) in Dynamics 365 Customer Insights.


Let's get's started.


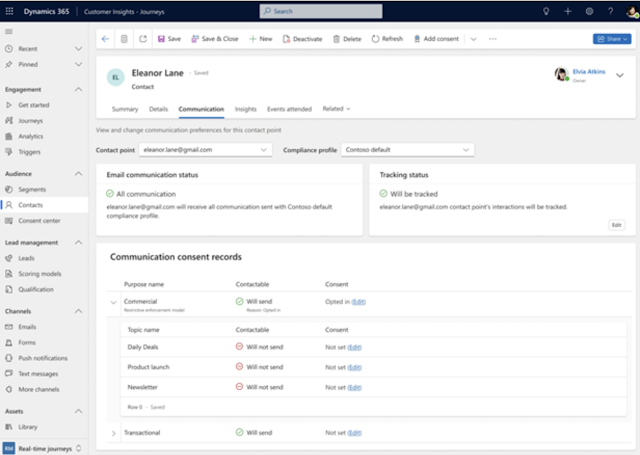
The enhanced contacts and lead forms empower you to swiftly view and update a customer's consent, streamlinig  the management of message types sent to your customers.


The comprehensive view provides a centralized location for handling consent across all channels and lines of business within your organisation.


Here are the key features:


1. Summary View: Quickly assess the consent provided by each contact or lead to determine if the customer is reachable at a glance.


2. Easy Modification: Modify consent for email addresses, phone numbers, and custom channels directly from the contact or lead forms. This control allows you to tailor the type of messages sent to the customer on each channel.


3. Granular Insights: Dive into the consent provided for each compliance profile configured for your organization. Understand customer consent preferences for each line of business.


Effortlessly manage customer consent and stay compliant with ease!.


That's it for today.


I hope this helps.
Malla Reddy Gurram(@UK365GUY)
#365BlogPostsin365Days


Saturday 24 February 2024

{Speaking} Let's gets started with Copilot Global Power Platform Bootcamp Aba - Nigeria

Hello Everyone,


Today I am going share my upcoming speaking session at Global Power Platform Bootcamp  Aba - Nigeria.


Let's gets started.


Today I  will be speaking at Global Power Platform Bootcamp Aba - Nigeria.


If you are interested join us at: link


My session at 4:15pm UK time.


All about Microsoft Copilot how it can be used in Dynamics 365 & Power Platform.


That's it for today.


I hope this helps

Malla Reddy Gurram(@UK365GUY)
#365Blogpostsin365days

Friday 23 February 2024

{How to} Trigger email based on the customer behavior on Dynamics 365 Customer Insights Journey


Hello Everyone,


Today I am going to show how to trigger email to the Account Manager when an email is clicked by the customer using  Power Automate Flow which will trigger based on the customer action on the email sent.


  Let's  gets started.


Suppose there is a requirement to track the customer behavior on the marketing email sent to the potential customer and you want to get some customer insights on the behavior then continue reading this blog post.


"Trigger Power Automate" its based on the Journey 


When an action is performed, based on the category of particular action.


   Follow the above steps and add this Flow in your Customer Insights Journey.


Email will be sent each time customer clicks on it, notification email will be sent along with who have clicked on the email then Account Managers can follow up with customer to nuture to qualify them into sales pipeline.


That's it for today.

I hope this helps.


Malla Reddy Gurram(@UK365GUY)
#365BlogPostsin365Days

Thursday 22 February 2024

{Do you know} Dynamics 365 Customer Insights would consider business days five or seven days

Hello Everyone,


Today I am going to share my thoughts on the Dynamics 365 Customer Insights working days as five or seven days.


Let's get's started.


In Dynamics 365 Marketing, the concept of business days typically aligns with Standard working days, which are Monday through Friday. Let's break it down:


1. Entity -Level Calendars:


When you open an entity like events, customers journeys or the main marketing calendar, you'll see a list view where you can switch between the calendar view and list view.


Relevant records (such as events or sessions) are plotted on the calendar based on their scheduled dates.


This types of calendar provides a system view selector for filtering the record shown.


2. Room-Level Calendars:


These calendars appear while viewing a specific record(e.g., a specific event).


They are integrated into the form view and might appear in their own tab or as a section alongside other settings.


Form-level calendars can only show and create records of one type of entity and are often related to the specific record where they appear.


3. Room-Reservation Calendar:


Specifically for event records, the room reservation calendar shows all room reservations assigned to the displayed event and its sessions.


Unreserved rooms are not shown, and the calendar is read-only( no session or reservation creation here).


4. Speaking Engagement Calendar:


For speakers records, this form-level calendar displays all speaking engagements associated with the currently displayed speaker.


5. Custom Calendars:


System customizers can add custom calendars to nearly any entity or form.


These custom calendars can extend the funtionality beyond the basic types described above.


Now, regarding processing times, most requests within Dynamics 365 Customer Insights are typically handled in about three business days once all necessary information is available.


So, whether it's configuring marketing calendars or handling other tasks, keep those business days in mind!.


That's it for today.


I hope this helps.


Malla Reddy Gurram(@UK365GUY)
#365BlogPostsin365Days


Wednesday 21 February 2024

{How to} Build Lead Scoring model in Dynamics 365 Customer Insights

Hello Everyone,


Today I am going to share my thoughts on how to build lead scoring model in Dynamics 365 Customer Insights.


Let's get's started.


To create a lead scoring model in Dynamics 365 Customer Insights, follow these steps:


1. Navigate to Outbound marketing >  Lead management > Scoring models. This will take you to a list of existing models.


2. On the command bar, select New. The New Lead Scoring Model page opens, with the Design tab shown. This designer is similar to other designers in Customer Insights - Journeys.


Here are some additional details to consider when creating lead -scoring models:


Lead -scoring prerequisites and requirements:


The Lead-scoring feature integrates various aspects of Customer Insights - Journeys, including contacts, leads, customer journeys, marketing forms, interactions and insights.


Only leads associated with parent contacts or accounts can be scored. Automatic lead scoring works for leads that have a parent contact or account associated with them.


For leads generated or updated by marketing forms configured to update both leads and contacts, the marketing form establishes the lead/contact pair.


Users can manually associate a lead with a parent contact or account using the inquiry stage of the lead to opportunity marketing sales process business process.


Scoring Interactions:


Dynamics 365 Customer Insights - Journeys calculates a score for each lead based on demographics details, firmographic details, and actions taken by the associated contacts(or for account-based leads, contacts belonging to the associated account).


Score interactions include opening an email, submitting a landing page, visiting your website or attending an event.


Each scoring model includes a sales-ready threshold. when a lead's score passes this threshold, it gets marked as sales ready, triggering other events within Dynamics 365, such as advancing the lead through its business process or alerting tele prospectors or salespeople.


That's it for today.


I hope this helps.

Malla Reddy Gurram(@UK365GUY)
#365BlogPostsin365Days


Tuesday 20 February 2024

{How to} Real time marketing customer journey send email notification to the manager based on customer clicks email on Dynamics 365 Marketing

Hello Everyone,


Today I am going to share my thoughts on how to send email notifications to the account manager based on the customers behavior.


Let's get's started.


To set up real-time email notifications for the manager based on customer clicks in Dynamics 365 Marketing, follow these steps:


1. Create a Trigger-Based Journey:


Navigate to Outbound marketing > Marketing Execution > Customer Journeys.


Click New on the command bar to create a new customer journey.


Choose to start from scratch.


In the customer journey designer, assemble the pipeline that defines each step of the journey.


2. Set Audience and Trigger:


Select Set audience (or click the "+" button).


Choose a segment that includes the contacts you want to target with your campaign. Ensure this segment contains fictional contacts with valid email addresses.


Add a trigger to the Journey. For example, you can use the Email link clicked trigger.


3. Create an Email Activity:


Add an Email tile to your journey.


Configure  the email message you want to send. you can use a previously designed and published marketing email.


In your email. define all the links in a custom way using the CloudPageUrl function. Use this function with two parameters:


  • The ID of your Cloud Page.
  • The URL to redirect to.
  • An eventDefinitionName (e.g., "followupEmail").


Example: 


<a href="%%=RedirectTo(CloudpageUrl(123, 'event', ' followupEmail' , 'redirectTo' , '5' ))==%%">Click  here</a>


4. Send Email Notification to the Manager:


Add an Email tile after the trigger.


Configure this email specifically for the manager. Use the appropriate email address for the manager.


Notify the manager about the customer interaction by including relevant details in the email content.


5. Test and Activate:


Test your customer journet thoroughly to ensure it works as expected.


Once satisfied, activate the journey to start sending real-time email notifications to the manager based on customer interactions.


Remember that real-time journeys allow you to engage customer promptly when they interact with your emails.


That's it for today.


I hope this helps.

Malla Reddy Gurram(@UK365GUY)
#365BlogPostsin365Days


Monday 19 February 2024

{Do you know} Where do they store customer information when a customer register for an event on Dynamics 365 Marketing

Hello Everyone,


Today I am going to share my thoughts on event registration, When a customer register for an event and where do they actually store customer information on Dynamics 365 Marketing.


Let's get's started.


When a customer registers for an event on Dynamics 365 Marketing, the records are stored in the Event Registration section. 


Here's how it works:


1. Event Registration Records:  Each time someone fills out an event registration form, their email address is checked to see if they already exist in Dynamics 365 as a Contact.


If not, a new Contact record is created for them, and an Event Registration is linked to that new Contact.


2. Event Management Work Area: To view all current registrations and pass assignments and to create them manually in the system, you can work in either of the following entities within the Events work area:


a) Events > Event > Event Registrations: Here: you can view and create registrations for all events.


b) Events > Event > Events: Open an event record and go to the Registration & Attendance tab to view and create registrations for the selected event.


To view or create individual session registrations, navigate to the Agenda tab of the event record and open a session listed there.


Remember, this process helps event managers evaluate resource needs, session capacities and attendees preferences. It ensures that attendees have reserved seats for the sessions they want to attend!.


That's it for today.


I hope this helps.

Malla Reddy Gurram(@UK365GUY)
#365BlogPostsin365Days


Sunday 18 February 2024

{How to} Create Lead Scoring Matrix on Dynamics 365 Marketing

Hello Everyone,


Today I am going to share my thoughts on how to create lead scoring on Dynamics 365 Marketing.


Let's get's started.


Suppose you have a requirement to create a brand new lead scoring matrix on Dynamics 365 Marketing.


How do you do that?


In Dynamics 365 Marketing, Lead scoring helps you prioritize and qualify leads based on their interactions and attribites. Let's dive into hoe you can set up lead scoring models:


1. Navigate to Scoring Models:


Go to Outbound marketing > Lead management > Scoring Models.


Here, you'll find a list of existing models. You can create, delete, search, sort or filter items in the list.


To create a new model, select New.


2. Design Your  Scoring Model:


When creating a new model, you'll be taken to the Design tab.


Use a combination of condition/action tile pairs to build your scoring models.


Conditions define the criteria for scoring(e.g email opens, webiste visits, form submissions).


Actions determine how points are assigned based on interactions(e.g.. +10 points for clicking an email link).


Actions determine how points are assigned based on interactions (e.g., +10 points for clicking an email link).


Connect these tiles to create a flow that calculates scores for leads.


3. Set Threholds:


Each scoring model includes a sales-ready threshold.


When a lead's score surpasses this threshold, it's marked as sales-ready.


This can trigger other events within Dynamics 365, such as advancing the lead through its business process or alerting salespeople.


4. Privacy Considerations:


Automatic lead scoring can introduce data privacy issues.

Ensure compliance with relevant data privacy regulations when using lead scoring features.


Remember, lead scoring  is a powerful tool, but thoughtful design and testing are essential for effective lead management.


That's it for today.


I hope this helps.

Malla Reddy Gurram(@UK365GUY)
#365BlogPostsin365Days

Saturday 17 February 2024

Improvements on Microsoft Dataverse connector to import large dataverse tables into Customer Insights - Data.

Hello Everyone,


Today I am going to share my thoughts on the improvements on Microsoft Dataverse Connector to import large dataverse tables into Customer Insights - Data.


Let's get's started.


Certainly! The Microsoft Dataverse Connector has undergone significant enhancements, enabling seamless import of large dataverse tables into Customer Insights - Data. 


Here are the key features:


1. Selective Tables Import:


You can now select specific tables, columns, and even rows from Dataverse to import into Customer Insights.

New row filters allow you to save time by choosing only the data you need.


2. Performance improvements:


The Dataverse connector has been optimized to be best choice for importing tables.


Smoothly import large Dataverse tables into Customer Insights without previous scale or performance limitations.


3. Flexible Column Processing:


Select only the columns you want to process and output in Customer Insights.

Apply filters to exclude inactive records or include records modified within a specific time frame(e.g the last year).


4. Automatic Linking:


Tables imported via the Dataverse connector are automatically linked to the unified CustomerProfile tables in Customer Insights.


These improvements empower you with more control, faster performance, and efficient data management within Dynamics 365 Customer Insights.


No more read-only mandatory tables selections!.


That's it for today.


I hope this helps.


Malla Reddy Gurram(@UK365GUY)
#365BlogPostsin365Days


Friday 16 February 2024

{How to} Export Dynamics 3765 CE table columns along its data types

Hello Everyone,


Today  I am going to show how to export the Dynamics 365 CE table columns and its data types.


Let's get's started.


Suppose you have a request from business to export the dynamics 365 CE data along with its data types.


How do you do that?


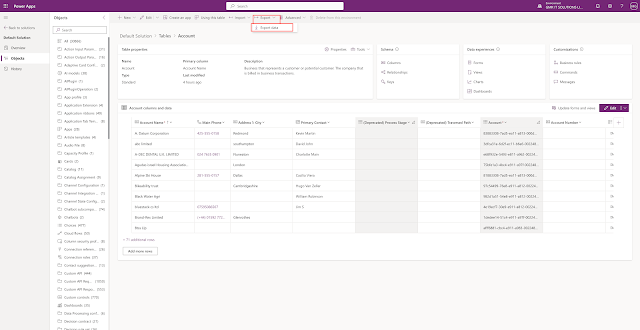
Certainly! To export Dynamics 365 CE table columns along with their data types, follow these stepss:


1. Open the Dynamics 365 CE Environment.


2. Navigate to the specific table you want to export.


3. Click on the Data tab.


4. From the submenu, select "Export data".


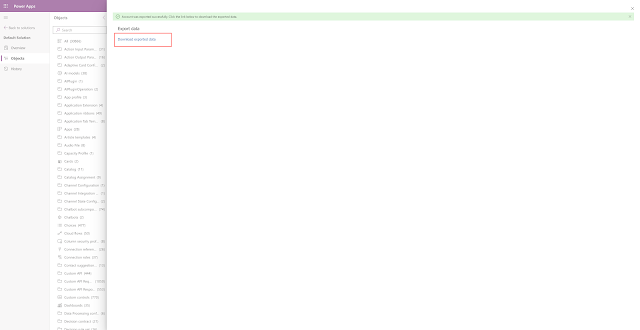
5. Wait a few moments for the process to complete.


6. Click the link that says "Download exported data" on the left side.


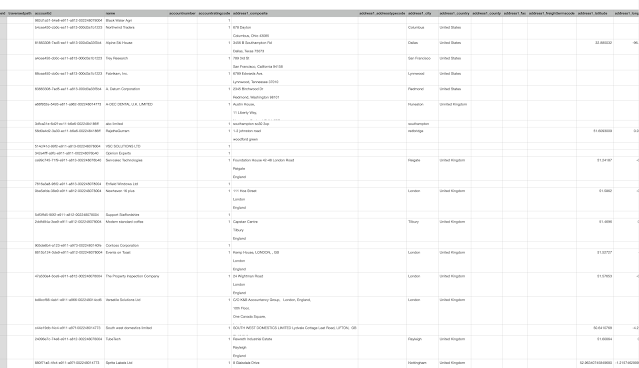
7. Extract the downloaded zip file to a folder.


8. Inside the folder, you'll find a CSV file. Each column in the CSV corresponds to a table column, including its name and data type.


Alternatively, you can use third-party tools like XrmToolBox with free plugins(such as Metadata related ones) to achieve similar results. However, the built-in method described above is provided by Microsoft and is straightforward. Happy exporting!.


That's it for today.


I hope this helps.


Malla Reddy Gurram(@UK365GUY)
#365BlogPostsin365Days


Thursday 15 February 2024

{How to} Lock and Unlock customizations for other user roles on Dynamics 365 Model Driven App

Hello Everyone,


Today I am going to show how to lock and unlock customizations for other user roles other than Administrators.


Let's get's started.


Login into Dynamics 365 Sales Hub.


Click on Sales Accelerator.


Settings new  work item appearance window will be displayed.


You can switch the admin mode to YES and a check box with the LOCK CUSTOMIZATIONS will appear on the right hand corner of the screen where the sellers can't edit any changes as admin mode is turned on, and save the changes.


That't it for today.


I hope this helps.

Malla Reddy Gurram
#365BlogPostsin365Days