Sunday 30 June 2024

{How to} Unlimited application installs now in Customer Insights

Hello Everyone,


Today I am going to share my thoughts on unlimited application installs now in Customer Insights.


Let's get's started.


As of June 30, 2024, Microsoft has removed application installation limits for Dynamics 365 Customer Insights.


Previously, there were restrictions on the number of installations per base license, but now you have 
unlimited application installs for Customer Insights - Journeys(real time journeys only) and Customer Insights-Data.


This means that as an admin, you can install these applications on as many production and sandbox environments in the Power Platform Admin Center as needed.


Admins with a paid Dynamics 365 Customer Insights license will no longer see the application installation counter and limits.


That's it for today.


I hope this helps.

Malla Reddy Gurram(@UK365GUY)
#365blogpostsin365days

{How to} Keep facebook audiences in sync with single connection export customer insights data.

Hello Everyone,


Today I am going to share my thoughts on keeping facebook audiences in sync with single connection export customer insights data.


Let's get's started.


With the recent release, managing your Facebook Ads exports in Dynamics 365 Customer Insights has become easier.


Now you can manage all your Facebook Ads exports using a single connection. Here's how it works:


1. Choose your audience: Set which custom audience in Facebook ads you want to update directly within the export settings,  rather than during connection setup.


2. Reduced Effort: Although you still need to reauthenticate your Facebook Ads Connection every 60 days, managing multiple exports with a single connection saves you time.


3. Seamless Transition: All your existing Facebook Ads connections and exports continue to function seamlessly.


That's it for today.


I hope this helps.

Malla Reddy Gurram(@UK365GUY)
#365blogpostsin365days

Friday 28 June 2024

{How to} Create Azure Communication Services for Dynamics 365 Customer Service Omnichannel

Hello Everyone,


Today I am going to show how to subscribe to Azure Communication Services on Azure Portal.


Let's get's started.


Let's say you have a requirement to Dynamics 365 Customer Service Omnichannel Voice Calls configuration.


In order to progress with the voice calls you will need Azure Communication Services(ACS) on Azure Portal.


Make sure you have Global Administrator role, then you will be able to create resource and then configure the phone number on the ACS.


That's it for today.


I hope this helps.

Malla Reddy Gurram(@UK365GUY)
#365blogpostsin365days

Thursday 27 June 2024

{Do you know} View analytics for Copilot's impact on your business with Dynamics 365 Customer Service

Hello Everyone,


Microsoft Copilot has introduced several features in Dynamics 365 Customer Service that can significantly enhance customer support, Let me break it down for you:


1. Ask Copilot a Question: Agents can use Copilot to ask  natural language questions and receive quick, informative answers. It's like having an experienced coworker available to chat all day, every day. Copilot searches company resources and returns relevant responses.


Agents can also rate the helpfulness of these answers.


2. Create Intelligent Email Responses: Copilot drafts contextual and personalized answers to questions on both chat and email. This feature streamlines communication with customers and ensures consistent, high quality. responses.


3. Understand Copilot Usage: Contact center managers can view agent feedback and understand how agents interact with Copilot. This helps identify areas where sources may need updates or removal.


4. Summarize Cases and Conversations: Released in september 2023, this feature allow Copilot to summarize  cases and conversations saving agents valuable time.


5. Business Impact: Copilot uses generative AI to improve tasks such as completing customer conversations triaging  and closing cases, and drafting and sending emails. Reducing handle times lead to improved customer satisfactions levels.


In summary, Copilot transforms the agent experience, enabling faster issue resolution, efficient case handling and automation of tedious tasks, ultimately enhancing customer service.


That's it for today.

I hope this helps,
Malla Reddy Gurram(@UK365GUY)
#365blogpostsin365days

Wednesday 26 June 2024

{How to} Use overflow for lengthy wait times for work items dynamics 365 customer service

Hello Everyone,


Today I am going to share my thoughts: use overflow for lengthy wait times for work items dynamics 365 customer service. 


Let's get's started.


Overflow handling in Dynamics 365 Customer Service can be a lifesaver during peak demand or when agents are unavailable.


Here's how it works:


1. Set Wait Time Limit: Administrators can define a reasonable wait times limit for work items in a queue.
When a work item exceeds this limit, it's marked for overflow.


2.Contingency Plan: If the wait time is exceeded, you can set up a contigency plan, For Instance, you might automatically transfer the work item to another queue with more available agents who can address the customer request.


3. Overflow Evaluation: Overflow conditions are evaluated before a work item is added to the queue. This ensures that customers who wait too long receive timely assistance.


Remember, overflow handling helps manage both surge conditions and after-hours calls, ensuring better customer satisfaction.


That's it for today.


I hope this helps.

Malla Reddy Gurram(@UK365GUY)
#365blogpostsin365days

Tuesday 25 June 2024

{How to} Option sets for field mapping in integrated search in Dynamics 365 Customer Service

Hello Everyone,


Today i am going to share my thoughts on the new feature of option sets for field mapping in integrated search in Dynamics 365 Customer Service.


Let's get's started.


Let me provide you with some information about option sets for field mapping in integrated search within Dynamics 365 Customer Service.


As part of adding an integrated search provider in Customer Service, you can configure a knowledge article schema through field mapping.


This allows you to map a knowledge article received from the search provider(the source property) to an attribute of the knowledge article entity (the target), based on an operation type, In addition to the out-of-the-box target fields, you can also add custom target fields for mapping, such as multi-select or single select option sets.


This feature enhances extensibility for migration and allows you to define custom target fields for mapping.


That's it for today.


I hope this helps.
Malla Reddy Gurram(@UK365GUY)
#365blogpostsin365days


Monday 24 June 2024

{How to} Ask about case data in Copilot help pane in Dynamics 365 Customer Service

Hello Everyone,


Today I am going to share my thoughts on asking about case data in Copilot help pane in Dynamics 365 Customer Service.


Let's get's started.


In Dynamics 365 Customer Service, you can use Copilot to ask about case data. Here are some types of questions agents can ask in the Copilot Ask a question pane:


1. Get details on high-priority cases for a specified date range.


2. Show active escalated cases.


3. Display cases that are due soon.


4. Show active cases that agents own.


5. Retrieve specific case details.


6. Obtain the case resolution details for a case.


To enable Copilot feature, follow these steps:


1. Turn on the Copilot help pane: Open the case you need to work on and enter "Get account summary" in the Copilot Ask a question pane. Copilot will summarize the account details of the customer whose case you've opened.


2.Enable Copilot case summaries: In the Customer Service admin center, select Make Copilot available to agents in the Copilot help pane.


You can find this option under Agent Experience > Productivity > Summaries  or Operations > Insights > Summaries.


Once enabled, agents can access Copilot case summaries.


Remember that Copilot provides real time AI assistance to help agents automate tasks and handle cases efficiently.


That's it for today.


I hope this helps.

Malla Reddy Gurram(@UK365GUY)
#365blogpostsin365days


Sunday 23 June 2024

{How to} New feature mprove usability and performance of the schedule board on Dynamics 365 Field Service

Hello Everyone,


Today I am going to share my thoughts on improving usability and performance of the schedule board.


Let's get's started.


With this new feature Dynamics 365 Field Service Schedule board enhancements, enhanced user experience, Improved performance, Future proof, Usability and modernization improvements.


New feature details:


Enhanced user experience: The improved schedule board architecture signifies a shift from extJS to React, which allows for a more responsive user interface, leading to a more intuitive and satisfying user experience for technicians and dispatchers.


Improved performance: An efficient diffing algorithm and a virtual Document Object Model(DOM) result in improved update and load times.
The schedule board loads faster and reacts instantly to user interactions, even under heavy load.


Future-proof: The new architecture is up to date with the lastest advancements in web technology, which improves maintenance and upgradability.


Usability and modernization improvements: The updated schedule board will bring requested customer asks such as working days of the week selector, week numbers, ability to reorder tabs per user, day line visibility and accessibility improvements.


That's it for today.

I hope this helps.

Malla Reddy Gurram(@UK365GUY)
#365blogpostsin365days

Saturday 22 June 2024

{How to} Create and update work orders in Teams with Copilot in Dynamics 365 Field Service

Hello Everyone,


Today I am going to show how to Create and update work orders in Teams with Copilot in Dynamics 365 Field Service.


Let's get's started.


To Create and update work orders in Teams with Copilot in Dynamics 365 Field Service, follow these steps:


1. Set up Copilot Integration:


Ensure you have Dynamics 365 Field Service and Microsoft Teams set up.


Install the Copilot app in Teams.


2. Create a Work Order:


In Teams, go to the Copilot app.

Click on New Work Order.

Fill in the relevant details (Customer, location, service, etc.).

Save the work order.


3. Update Work Orders:


Open the work order in Teams.

Make necessary changes (status, priority, description, etc).

Save the updates.


4. Collaborate with Your Team:


Mention team members in the work order chat.


Discuss and collaborate on work orders details.


Remember to customize the process based on your organization's specific needs.


That's it for today.


I hope this helps.

Malla Reddy Gurram(@UK365GUY)
#365blogpostsin365days


Friday 21 June 2024

{How to} Enhanced Copilot experiences in the web app in the Dynamics 365 Field Service

Hello Everyone,


Today  I am going to share my thoughts on the new feature enhanced copilot experiences in the web app.


Let's get's started.


The Dynamics 365 Field Service web app now includes enhanced Copilot capabilities. Field managers can use natural language to interact with Copilot for work order information.


Which copilot can retrieve summarize and present in an easily digestible format.


It also offers data driven recommendations to optimize scheduling and work order management.


This new feature details:


Its usability improvements for Copilot in Field Service help your team of technicians, dispatchers and service managers adopt and use these capabilities in their exisiting workflows.


Copilot provides direct access to the wealth of data stored within Microsoft Dataverse, including key tables from Field Service like work orders and bookings.


This guarantees that field service teams always have the most up to date information at their fingertips.


That's it for today.


I hope this helps.

Malla Reddy Gurram(@UK365GUY)
#365blogpostsin365days

Thursday 20 June 2024

{Do you know} New and intuitive user experience for Field Service mobile

Hello Everyone,


Today I am going to share my thoughts on the new and intuitive user experience for Field Service Mobile.


Let's get's started.


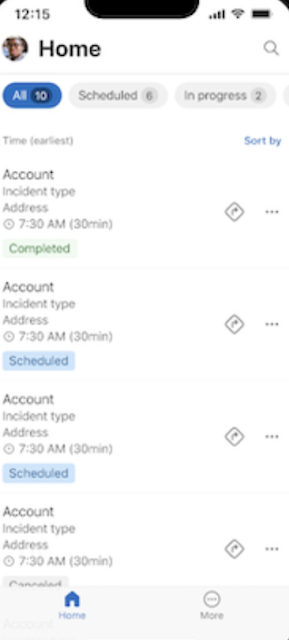
The new user experience for Dynamics 365 Field Service mobile includes:


A modern UX with familiar navigation, gestures and controls.

An updated booking form with simplified grids for tasks, products and services.

A refreshed look in the home page, veiws and work order management.

Large touch targets for ease of use and accessibility.


New feature details:


With the new native user experience, users get:


Modern look and feel in the home page, views and other aspects of work order management.


Refreshed user experience bottom navigation bar, left navigation and settings area.


Large touch targets for ease of use and accessibility.


Simplified booking list experience, with the ability to change status with swipe gesture and quickly get directions.


Embedded guides for step by step instruction with embedded pictures and branching flows.


Still have access to the unified interface extensions or customizations made by you in the app through a simple transition experience.


That's it for today.


I hope this helps.

Malla Reddy Gurram(@UK365GUY)

#365blogpostsin365days 


Wednesday 19 June 2024

{Do you know} Improve engagement and compliance with double opt-in in Dynamics 365 Customer Insights

Hello Everyone,


Today  I am going to share my thoughts on improving engagement and compliance with double opt-in.


Let's get's started.


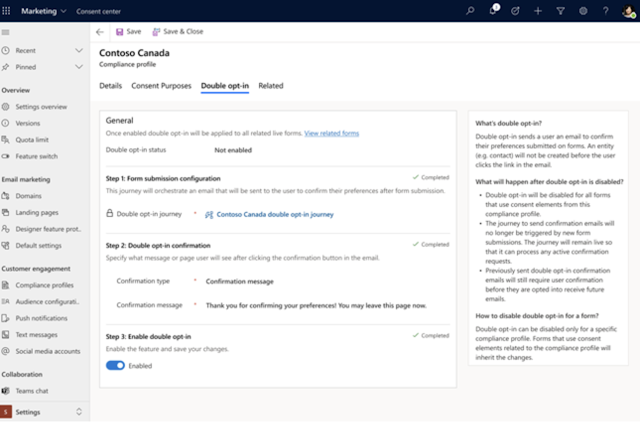
Double opt-in adds great value to the email marketing, so ensuring a high quality, engaged subscribers base by requiring users to confirm their subscription through a follow-up email.


This process not only reduces spam complaints and bounces rates but also enhances sender reputation and supports compliance with  data protection regulations, 


By implementing double opt-in, marketers can cultivate a more effective email marketing strategy, leading to increased open and click-through rates and a better overall brand experience for subscribers.


New feature details:


  • Administrator can enable double opt-in at a compliance profile level and easily enforce double opt-in flow for all the forms using the compliance profile.

  • Use familiar concepts like triggers and journeys to orchestrate the double opt-in process, allowing you to customize the process to meet your business needs.

  • New contacts (or leads) won't be created until the customer has confirmed their opt-in keeping your contact and lead lists free of bad data.


That's it for today.

I hope this helps.

Malla Reddy Gurram(@UK365GUY)
#365blogpostsin365days

Tuesday 18 June 2024

{Do you know} Automate seamless handoffs between marketing and sales in dynamics 365 customer insights

Hello Everyone,


Today I am going to share my thoughts on Automating seamless handoffs between marketing and sales.


Let's get's started.


To automate seamless handoffs between marketing and sales in Dynamics 365 Customer Insights, you can:


Create sales-related activties and records directly from customer insights - journeys, such as phone calls, tasks, leads or opportunities.This feature is in preview.


Respond quickly to incoming leads by routing them directly to sales agents.


Both marketers and salespeople can have access to the same contact, lead, and account data, allowing for collaboration throughout the Customer Insights - Journeys and sales funnels. 


New feature details:


You can create  sales related activities and records directly from Customer Insights - Journeys.

1. Add sales activities such as phone calls or tasks, or complete lead or opportunities in your journeys.

2. Respond  quickly to incoming leads by routing them directly to sales agents.


That's it for today.


I hope this helps.

Malla Reddy Gurram(@UK365GUY)
#365blogpostsin365days

Monday 17 June 2024

How to give permissions to Power BI reports to view from Dynamics 365 Customer Service

Hello Everyone,


Today I am going to show how to manage access to Power BI Reports which are published on the Dynamics 365 Customer Service.


Let's get's started.


Recently i had experienced this real time issue that a user is unable to access Power BI Report which is published on the Dynamics 365 Customer Service.


How do i resolved it?


You can manage access to reports from Dynamics 365 Customer Service Security Roles management by allowing to view the dashboard.


Second way of managing access is to give access to the Workspace on Power BI.


Anyone with Admin Access to the Workspace can give permissions to the workspace content list page.


1. Go to the WORKSPACE and click on Access.


2. Add security groups, distribution lists, M365 groups or individuals to these workspaces as admins, members, contributors or viewers.


That's it for today.


I hope this helps.


Malla Reddy Gurram(@UK365GUY)
#365blogpostsin365days


Sunday 16 June 2024

{Do you know} Use segments to decide which path a customer should take on Dynamics 365 Customer Insights

Hello  Everyone,


Today i am going to share my thoughts on using segments to decide which path a customer should take on Dynamics 365 Customer Insights.


Let's get's started.


To decide which path a customer should take on Dynamics 365 Customer Insights using segments, you can follow these  steps:


1. Create segments: Choose how to create a segment based on your target audience. You can use demographic, transcational, or behavioral attributes to group  your customers.


2. Manage existing segments: Go to the Insights > Segments page to view and manage your created segments.


3. View segment details: If needed, you can export segments for further analysis or use in other applications.


4. Export segments: If needed you can export segments for further analysis or use in other applications.


New feature details:


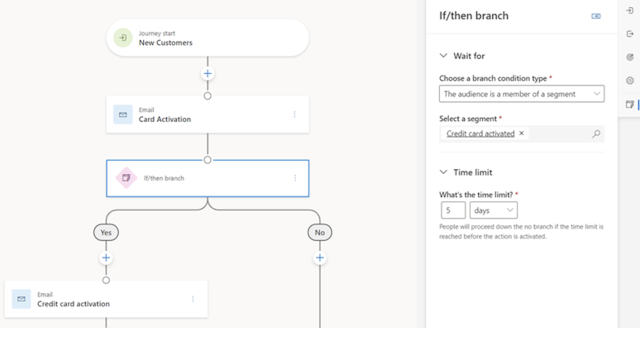
Create journeys that wait until a customer becomes part of a segment continuing to the next steps in the journeys.


1. Choose a segment as the condition for an if/then branching step.


2. Set the amount of time you want to wait for the customer to become a member of the sgement before continuing.


3. Choose which actions to take if the customer is or is not a member of the segment.


That's it for today.

I hope this helps.

Malla Reddy Gurram(@uk365guy)
#365blogpostsin365days

Saturday 15 June 2024

{Do you know} Orchestrate journeys using any marketing interaction in dynamics 365 customer insights

Hello Everyone,


Today I am going to share my thoughts on Orchestrate Journeys using any marketing interaction in dynamics 365 customer insights.


Let's get's started.


In Dynamics 365 Customer Insights, you can now orchestrate customer journeys based on marketing interactions. Here's how it works:


1. Marketing Interaction Triggers: Leverage triggers like "email link clicked" or "email blocked" to identify customer interactions with your marketing messages.


2. Real-Time Adaption: Instantly adapt your strategies based on customers' real-time interactions. This ensures that every message you send hits the right note.


3. Personalization: By engaging customers based on their interactions, you significantly increase conversion chances through greater personalization.


This feature allow you to engage customers effectively and make informed business decisions.


That's it for today.


I hope this helps.

Malla Reddy Gurram(@UK365GUY)
#365blogpostsin365days

Friday 14 June 2024

{Do you know} Configure list view in the new mobile experience in Dynamics 365 Field Service

Hello Everyone,


Today I am going to share my thoughts configure list view in the new mobile experience in Dynamics 365 Field Service.


Let's get's started.


In the new Field Service Mobile experience, you can configure list views to display relevant columns for tables such as assets, work orders, or customer accouns . Here are the details.


1. Choose Columns: Makers can select up to five columns per table to display in the mobile list view.


2. Icon Removal: The icon in the list view is removed, saving valuable mobile screen space.


3. Performance Improvements: The new list view offers smoother scrolling and better performance with in-built lazy load.


That's it for today.

I hope this helps.

Malla Reddy Gurram(@UK365GUY)
#365blogpostsin365days


Thursday 13 June 2024

{Do you know} Upcoming feature Improve reliability of insights with advanced bot protection

Hello Everyone,


Today I am going to share my thoughts on the upcoming new feature  improving reliability of insights with advanced bot protection.


Let's get's started.


By Implementing advanced bot protection, you can improve the quality of your insights.


The data you collect will be more accurate, representing genuine human interactions.


The reliability extends to your decision-making processes, allowing you to make informed choices based on trustworthy information.


That's it for today.


I hope this helps.

Malla Reddy Gurram(@UK365GUY)
#365blogpostsin365days


Wednesday 12 June 2024

{How to} Improve engagement by editing emails in live journeys in Dynamics 365 Customer Insights - Journeys

Hello Everyone,


Today I am going to share my thoughts on the preview feature: improve engagement by editing emails in live Journeys on Dynamics 365 Customer Insights.


Let's get's started.


To improve engagement by editing emails in live journeys, follow these steps in Dynamics 365 Csutomer Insights  - Journeys:


1. In your journeys, select the email tile, then go to properties and choose the email title.


2. Click the edit button in the email editor, then select continue.


3. Make the desired changes to the email components that can be edited in a live journey.


4. Select finish editing to apply the changes.


This feature allows you to easily modify email content and design without disrupting the customer experience.

You can adapt to changing customer needs and preferences while optimizing engagement and conversion rates.


That's it for today.


I hope this helps.

Malla Reddy Gurram(@UK365GUY)
#365blogpostsin365days

Tuesday 11 June 2024

{Do you know} Manage crew membership on daily basis on Dynamics 365 Field Service.

Hello Everyone,


Today I am going share my thoughts on managing crew membership on daily basis on Dynamics 365 Field Service.


Let's get's started.


In Dynamics 365 Field Service, you can efficiently manage crew membership on a daily basis. Here's how:


1. Create a Crew:


A crew is a bookable resource that acts as a container for child resources (member of the crew).


Open the Resources area, select " Resources," and create a new resource with the type "Crew"


Provide a name, time zone and crew strategy (e.g., Crew Leader Management, Crew Member Self-Management, or Cascade and Accept Cascade Completely).


Set start and end locations for the crew.

Save the crew configuration.


2. Add/Remove Members:


You can quickly make membership changes for crew resources by adjusting the crew allocation.


Swap a resource from one crew to another, add an unassigned resources to a crew, or remove a resource from a crew.


These changes apply for a single day in the crew's time zone, and future bookings reflect the updated membership.


3. Morning Shuffle Control:


To manage crew membership for a specific day, use the morning shuffle control.


Add or remove resources from a crew or swap resources between crews to efficiently fill any gaps.


Existing bookings are adjusted to reflect the changes.


Remember, crew strategies allow you to tailor how crews manage their work based on your specific needs.


Whether it's crew leader management or self-management, Dynamics 365 Field Service provides flexibility to streamline crew scheduling and collaboration.


That's it for today.


I hope this helps.

Malla Reddy Gurram(@UK365GUY)
#365blogpostsin365days


Monday 10 June 2024

{How to} Integrate financial and inventory management from Dynamics 365 Field Service

Hello Everyone,


Today I am going to share my thoughts on integrating the financial and inventory management from Dynamics 365 Field Service.


Let's get's started.


Integrating financial and inventory management can significantly enhance operational efficiency. Here are some ways to achieve this:


1. Dynamics 365 Integration:


Dynamics 365 Field Service can seamlessly integrate with Dynamics 365 Finance and Dynamics 365 Supply Chain Management. By enabling this integration, you connect work order related financial and inventory data without additional effort or complexity.


Real-time pricing and costing information from work orders can be synced into finance and operations apps, ensuring accurate financial tracking.


2. Benefits of Integration:


Optimized Inventory: Integration allows you to plan effectively and meet product availabilty and ROI goals.


Visibility: Supply  chain partners gain visibility into inventory levels.


Accurate Financial Reporting: Integration ensures that Inventory data is accurately reflected in financial reports.


Remember, integrating these systems streamlines processes, reduces manual reconciliation efforts, and enhances overall business performance.


That's it for today.

I hope this helps.

Malla Reddy Gurram(@UK365GUY)
#365blogpostsin365days

Sunday 9 June 2024

{Do you know} Integrate Dynamics 365 Field Service with Business Central

Hello Everyone,


Today I am going to share my thoughts on Integration of Dynamics 365 Field Service with Dynamics 365 Business Central.


Let's get's started.


To integrate Dynamics 365  Field Service with Business Central, follow these steps:


1. In Business Central, go to the Assisted Setup page.


2. Choose Set up integration to Dynamics 365 Field Service.


3. Run the assisted setup guide.


4. Import the Dynamics 365 Field Service Solution.


5. Enable the Dynamics 365 Field Service Connection.


This integration streamlines service operations, allowing you to create and manage work orders in Field Service, track service tasks, assign resources, and capture consumption details. Once work orders are completed, data seamlessly transfers to Business Central for further processing, including invoicing and fulfillment. 


It's a unified and efficient workflow that eliminates manual data entry and improves financial management!.


That's it for today.

I hope this helps.

Malla Reddy Gurram(@UK365GUY)
#365blogpostsin365days


Saturday 8 June 2024

{Do you know} Manage postal codes globally on Dynamics 365 Field Service

Hello Everyone,


Today I am going to share my thoughts on managing postal codes globally on Dynamics 365 Field Service.


Let's get's started.


Managing postal codes globally in Dynamics 365 Field Service is crucial for efficient service operation's.


Here's how you can achieve this:


1. Global Postal Code Support:


Organisations can now handle service areas with identical postal code across different countries.


To set this up, add a country code to your postal code table. This territory will automatically match based on both the country code and postal code.


2. Configuration Steps:


In Dynamics 365 Field Service, open the Settings area.

Navigate to the General section and select Postal Codes.

Choose the postal code you want to modify and edit the record. You can also bulk edit muliple records if needed.

Don't forget to save your changes.


By appending country codes to the postal codes of your service territory.you'll improve global support and streamline operations.


That's it for today.


I hope this helps.

Malla Reddy Gurram(@UK365GUY)
#365blogpostsin365days


Friday 7 June 2024

{Do you know} Get automatic prompts from Copilot on Dynamics 365 Customer Service

Hello Everyone,


Today I am going to share my thoughts on the Dynamics 365 Customer Service getting automatic prompts from Copilot.


Let's get's started.


Copilot in Dynamics 365 Customer Service Provides real-time assistance to customer service agents.


One of its features is automatic prompts. When enabled in the Customer Service admin center, these prompts give contextual suggestions to agents based on the active case or customer conversation context.


This helps agent quickly ask questions and get help, ultimately reducing handle times and improving agent and customer satisfaction.


If you're interested in enabling personal quick replies, you can enable this feature from customer service admin center, automatic prompts give contextual suggestions to agents on what they can do next based on the active case or customer conversation context.


This makes it easier for customer service agents to quickly ask questions and get help.


That's it for today.


I hope this helps.


Malla Reddy Gurram(@UK365GUY)
#365blogpostsin365days


Thursday 6 June 2024

{How to} Customize how records are sorted in the Dynamics 365 Customer Service inbox

Hello Everyone,


Today I am going to share my thoughts on the Customizing how records are sorted in the Dynamics 365 Customer Service Inbox.


Let's get's started.


Certainly! To customize how records are sorted in the Dynamics 365 Customer Service inbox, follow these steps:


1. Admin Configuration:


As a administrator, access the Customer Service admin center app.


Navigate to Workspace in the site map.


Next to Agent experience profiles, select Manage


2. Custom Sort:


The custom sort feature users to choose their desired attributes for sorting records beyond just customer and date.


Configure the agent sort experience by entity to give agents the flexibility they need to drill down into their inbox.


3. Agent Experience:


When creating or editing a view, you can also customize sorting for specific columns.


In the Configure Sort Order dialog box, select the column you want to sort by (ascending or descending order) and click OK.


That's it for today.


I hope this helps.

Malla Reddy Gurram(@UK365GUY)
#365blogpostsin365days


Wednesday 5 June 2024

{How to} Bring your own entity into the inbox on Dynamics 365 Customer Service

Hello Everyone,


Today I am going to share my thoughts on bringing your own entity into the inbox on Dynamics 365 Customer Service.


Let's get's started.


In Dynamics 365 Customer Service, administrators can add custom entities to the inbox and custom entities to the inbox and create inbox views. 


The feature provides by allowing you to add and view results from the inbox views panel.


Here are the details:


1. Business Value:


As an administrator, you gain the ability to add your custom entity to the inbox, enhancing the user experience.


You can create customized views tailored to the needs of your users.


2. Feature Details:


Bring your Own Entity(BYOE):

An admin level configuration experience for the inbox.


Supports any entity that's enabled in the Customer Service workspace app.


Allow agents to manage all their work items from a central location.


3. How to configure:


In the Customer Service admin center:


Navigate to Workspaces.

Next to Agent experience profiles, select the profile you want to edit.


Under Inbox, choose Edit.


You can also bring your own entities into the inbox by editing the profile in the Customer Service workspace app.


That's it for today.

I hope this helps.

Malla Reddy Gurram(@UK365GUY)
#365blogpostsin365days