Friday 26 April 2024

{How to} Allow external users into your Microsoft Teams Tenant

Hello Everyone,


Today  I am going to show how to grant access to your Microsoft Teams tenant.


Let's get's started.


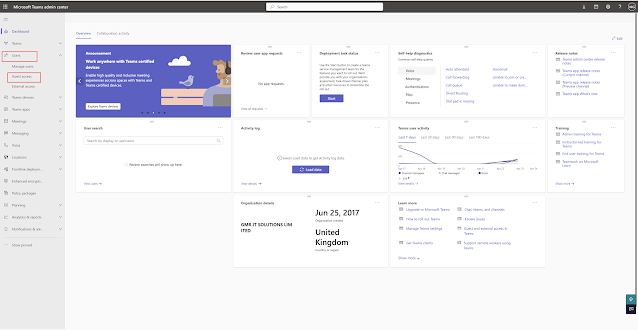
Login into Microsoft Teams Admin Center.


Click on the users


Guest Access = ON


Then save the changes.


Note: In order to make this change you need to be global administrator or Microsoft 365 Administrator.


That's it for today.

I hope this helps.

Malla Reddy Gurram(@UK365GUY)
#365blogpostsin365days

Thursday 25 April 2024

{Omnichannel} Automatically remove customer off hold on call transfer

Hello Everyone,


Today I am going to share my thoughts on the call handing automatically remove customer off hold on call transfer(preview feature).


Let's get's started.


Dynamics 365 Customer Service Omnichannel - Customer calls and the agent pick up the call and then the call needs to be transferred to another agent, in that case the call put on hold and transfer the call.


So when the transferred call being answered by another agent then the call automatically taken off from hold. Tranferring agent need need not be done anything.


This feature still in preview. 


Note: If this feature needs to disabled then system administrators can turn off from the Customer Service Admin Center.


That's it for today.


I hope this helps.


Malla Reddy Gurram(@UK365GUY)
#365blogpostsin365days

Wednesday 24 April 2024

{Omnichannel} Automatically pause, resume call recording and transcription

Hello Everyone,


Today I am going to share my thoughts on the preview feature where you can automatically pause, resume call recording and transcription.


Let's get's started.


When agents puts a customer on hold and removes the customer from hold the call recording and transcription are automatically paused and resumed.


Customer Service Agents manually puts the customer on hold, the recording and transcription will automatically pause.


Call which is paused automatically resume when the customer service agent take the customer off hold.


This helps ensure that the agents say while the customer is on hold is not captured in the transcript(which is usally meant to be an exchange between the customer and the agent.


Note: By default this feature is not available and it must be set per channel at the workstream level.


That's it for today.

I hope this helps.

Malla Reddy Gurram(@UK365GUY)
#365blogpostsin365days

Tuesday 23 April 2024

{How to} Turn on release feature to monthly channel for Power Platform environments

Hello Everyone,


Today I am going to show how to turn on the monthly channel(preview feature) for model driven app.


Let's get's started.


Click on the Apps and Open the Dynamics 365 Customer Service Hub and then settings.


So model  driven apps running in Power Platform environments with the app release channel value of Auto will use monthly channel  starting with 2024 release wave 1.


New feature is the next step in gradually shifting from semi-annual channel to monthly channel to provide users with improvements as they become available.


Apps in Dynamics 365 enabled environments with the app release channel value of Auto will come to use semi-annual channel until the 2024 release wave 2.


App release channel types:


1. Auto: This feature allow wave releases should be automatically applies to the model driven app, if the maker has not  made an explicit selection of monthly or semiannual.


2. Monthly: This applies to the new apps are created they default to Monthly.


3. Semi Annual : Makers can use the app designer to set the app release channel to Semi-Annual Channel before the 2024 release wave 1 to ensure no channel behavior.


That's it for today.


I hope this helps.


Malla Reddy Gurram(@UK365GUY)
#365blogpostsin365days


Monday 22 April 2024

Auto-claim policies on M365 Admin portal

Hello Everyone,


Today I am going to share my thoughts auto claim policies in the M365 Admin portal.


Let's get's started.


How to enable the Auto-claim policies?


Click on the Settings:


You have not chosen where the license auto-claim policies are applied to. Please note that if you create an auto-claim policy in the M365 Admin Portal, it will be applied to "All environments' by default. 


However, if a policy is automatically generated for you, it will only be applicable to 'Managed environments' unless you choose a different option here.


You can apply auto-claim policies on 


1. All environments.


2. Only Managed Environments: Restrict licensing auto claim to Only Managed Environments.


That's it for today.


I hope this helps.

Malla Reddy Gurram(@UK365GUY)
#365blogpostsin365days


Sunday 21 April 2024

{Do you know} Use generative AI Insights and other analytics enhancements to improve your copilots

Hello Everyone,


Today I am going to share my thoughts on the preview feature on significance of using generative AI insights and other analytics enhancements to improve your copilots.


Let's get's started.


With the use of the generative AI insights you can immediately begin to improve the effectiveness of your chat by leveraging enhanced analytics to understand where your copilot and is not helping your users and how it can be improved.


Copilot admins and makers can see new and improved analytics directly in the Microsoft Copilot Studio app.


They can instantly take actions  to address low customer satisfaction(CSAT) and improve the deflection rate.


That's it for today.


I hope this helps.

Malla Reddy Gurram(@UK365GUY)
#365blogpostsin365days


Saturday 20 April 2024

{Did you know} Deploy copilots to WhatsApp, Azure Communication Services Chat and SMS channels

Hello Everyone,


Today I am going to share my thoughts on the deploy copilots to WhatsApp, Azure Communication Services Chat and SMS channels.


Let's get's started.


Microsoft Copilot Studio  allows creators to connect with their consumer and enterprise audiences across various channels. In collaboration with Azure Communication Services, Copilot Studio is introducing support for the following channels:


1. WhatsApp: WhatsApp channel support in Microsoft Copilot enables customers in many markets to access a large audience previously unavailable.


2. SMS through Communication Services: This brings native SMS support to Microsoft Copilot Studio copilots.


3. Communication Services Chat: A multipoint chat service that enables bot support for custom, multipoint chat-based solutions.


These channels represent some of the largest addressable audiences for copilots, and they enhance the reach and engagement capabilities of Copilot Studio. 


Creators can provision and Azure Communication Services resource, and then connect their copilots to these new channels. Whether it's reaching users of WhatsApp, engaging via SMS, or providing chat-based solutions, Copilot Studio is expanding its capabilities to meet diverse communication needs.


Note: This is still preview functionality.


That's it for today.


I hope this helps.

Malla Reddy Gurram
#365blogpostsin365days

Friday 19 April 2024

{How to} Use copilot easily in canvas app

Hello Everyone,


Today I am going to share my thoughts on the use of copilot easily in canvas app.


Let's get's started.


Copilot functionality is turned on, by default in canvas app that connect to Dataverse data.


So no special configuration is needed to use copilot.


It is available when a user asks a question and can help them better understand their data.


Microsoft is bringing copilot to more apps and more users.


Note: Copilot is already turned on in canvas apps that connect to Dataverse data so there's no special configuration needed by makers or administrators.


Copilot is available right away when users ask questions and help them better understand their data.


Example: users can ask which employee has lowest sales or which warehouse is out of stock for a certain SKU.

Copilot queries Dataverse tables to find answers.


That's it for today.


I hope this helps.

Malla Reddy Gurram(@UK365GUY)
#365blogpostsin365days


Thursday 18 April 2024

{How to} Use the Power Platform Settings app

Hello Everyone,


Today I am going to share my thoughts on the preview feature use of power platform environment settings app.


Let's get's started.


Certainly! The Power Platform Environment Settings app is a powerful tool that replaces the legacy web client experience.


It provides a modern, performant, accessible, secure and extensible settings management experience for application developers. Here are the key details:


Legacy settings:


Modern advanced settings:


1. Unified Experience: The Power Platform Environment Settings app offers a single, unified interface for application developers to create settings for their applications. It streamlines the process and ensures consistency.


2. Security and Access Control: Just like the existing legacy experience, the new app provides robust security features. Developers can configure access control settings and manage during the transition.


3. Extensibility: The app suppports extensions, allowing developers to customize and extend settings as needed. Any existing extensions created by customers will be preserved during the transition.


4. Advanced Setting Redirection: Initially, existing links for advanced settings from various locations in Power Platform will be redirected from the legacy settings web client to the new Power Platform Environment app. However, administrators have the flexibility to turn off this redirection until the feature reaches general availability.


That's it for today.


I hope this helps.


Malla Reddy Gurram(@UK365GUY)
#365blogpostsin365days

Wednesday 17 April 2024

{How to} Select columns downloaded on mobile devices on model driven apps

Hello Everyone


Today I am going to show how to select columns downloaded on mobile device while offline from maker portal for model driven apps.


Let's get's started.


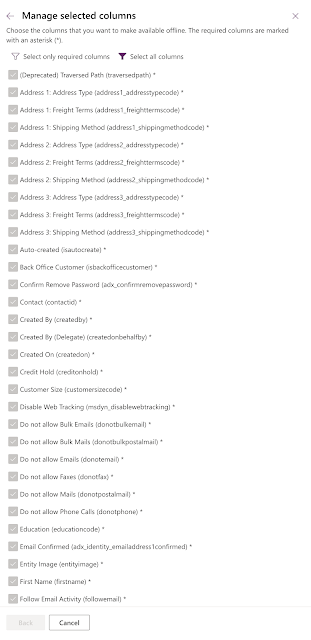
Now you can select the columns of a table that are downloaded on mobile devices for offline use. The fewer columns you select the faster the app downloads the data on the device for usage without conncectivity.


How do you do that from maker portal.


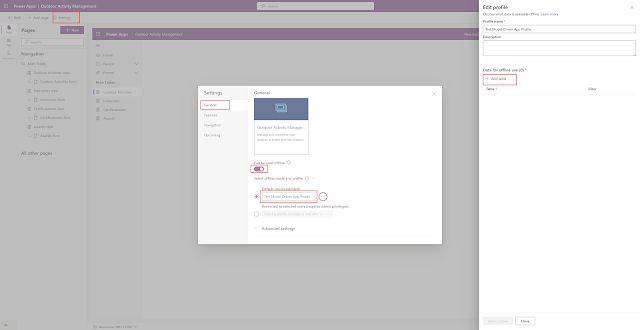
Edit the Model driven app and click on the settings:


Go to general  then on the select offline mode and profile > Default > select your model driven app >


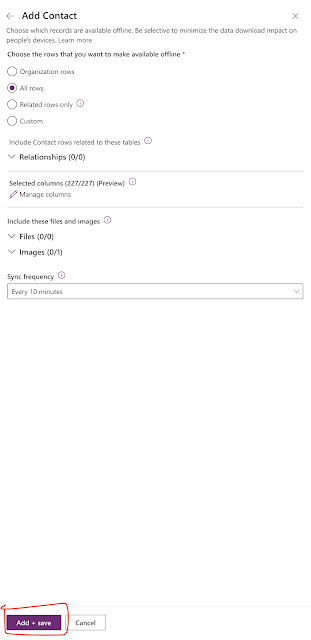
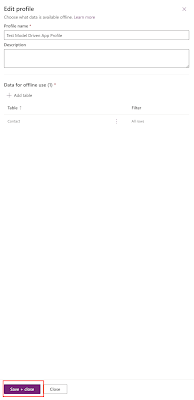
Then click on "...." and click on edit selected profile : a new window will be opened on the right hand side where you can select the table and fields.


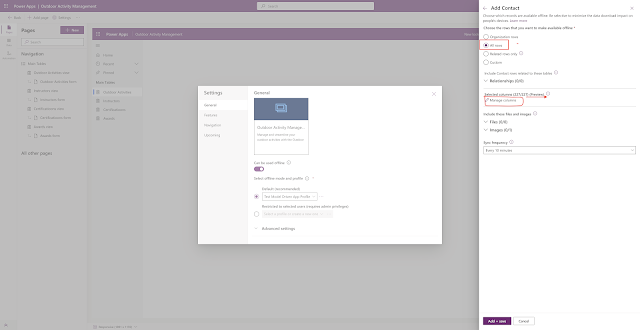
Then select the contact table and all rows  then manage columns,  all columns or required rows only or custom or organization rows will be appeared and then select the columns you want to add the app.


Then add + save.


Then save + close.


Finally Save and Publish.


That's it for today.


I hope this helps.


Malla Reddy Gurram(@UK365GUY)
#365blogpostsin365days


{Do you know} Modernize maker experience security settings in maker portal

Hello Everyone,


Today I am going to show how to create new security profile from maker portal.


Let's get's started.


Now with the maker portal users can have modern security role settings.


How do you do that?


Login into your www.make.powerapps.com


So Enable makers to use a modern and accessible security role editor while creating apps.


Now, makers can configure security role settings in Power Apps using a new security role editor.


This feature includes a new panel called New Role and lets makers configure column security profiles.


That's it for today.


I hope this helps.

Malla Reddy Gurram(@UK365GUY)
#365blogpostsin365days


Tuesday 16 April 2024

{How to} Direct new makers to their own developer environments in power platform admin center

Hello Everyone,


Today I am going to show how to enable direct new makers to their own developer environments in power platform admin center.


Let's get's started.


Login into power platform admin center


Go to settings > Tenant settings:


Click on Environment routing(preview)


This is preview feature and is not for production use.


That's it for today.


I hope this helps.

Malla Reddy Gurram(@UK365GUY)
#365blogpostsin365days


Monday 15 April 2024

{Do you know} Explore enhancements to outbound dialing in Omnichannel Customer Service

Hello Everyone,


Today I am going to share my thoughts on the new preview feature of Omnichannel customer service explore enhancements to outbound dialing.


Let's get's started.


Let's delve into the recent enhancements to outbound dialing. These improvements aim to streamline the calling process for agents. Here are the key features.


1.Search and Call: Agents can now search for customer contacts or accounts directly from the outbound dialer and initiate calls. This makes placing calls more efficient and convenient.


2.Customer Record Access: Additionally, agents can open the customer record directly from the call history. This seamless integration allows them to access relevant information while on a call.


These enhancements enhance productivity and provide a smoother outbound dialing experience for customer service teams.


That's it for today.


I hope this helps.


Malla Reddy Gurram(@UK365GUY)
#365blogpostsin365days

Sunday 14 April 2024

{Do you know} Enhancements in email composition experience for agents in Dynamics 365 Customer Service

Hello Everyone,


Today i am going to share my thoughts on preview feature enhancement in email composition experience for agents on Dynamics 365 Customer Service.


Let's get's started.


Certainly! Let's delve into the enhancements that have been introduced to improve the email composition experience for agents.


1. Drag and Drop Recipients: Agents can now seamlessly move recipients between the To, CC, and BCC fields while composing emails. This feature streamlines the process and enhances efficiency.


2. Recipient Email Addresses Displayed: The new experience allows recipients email addresses to be shown alongside their names. This configuration provides clarity and ensures accurate communication.


3. Resolve Email Addresses to Dynamics 365 Records: Agents can easily link email addresses to corresponding Dynamics 365 records. This functionality simplifies tracking and management.


4. Out of Office Status Visibility: Agents can now view the Out of Office Status set by recipients. This insight helps agents tailor their communication effectively.


These enhancements aim to save time, increase productivity and enhance the overall email composition process for agents.


That's it for today.


I hope this helps.

Malla Reddy Gurram(@UK365GUY)
#365blogpostsin365days

Saturday 13 April 2024

{How to} Create work orders in Teams using AI on Dynamics 365 Field Service

Hello Everyone,


Today I am going to share my thoughts on how to create work orders in Teams using AI on Dynamics 365 Field Service(preview).


Let's get's started.


Creating work orders in Teams using AI on Dynamics 365 Field Service is a feature that allows frontline workers to create, view and manage work orders within Microsoft 365 applications, including Microsoft Teams. 


This is made possible by harnessing the power of generative AI for assisted work order creation. With this feature, users can get assistance for work order creation and scheduling with Copilot in Microsoft Teams.


Here's a high level overview of how it works:


1. Work Order Creation: Users can create work orders directly within Teams. The AI-based copilot assists by extracting relevant details from conversations and filling in the details of the work order form based on the text.


2. View and Manage: Users can also view and manage these work orders within Teams, making the process seamless and integrated with their daily workflow.


3. Integration: The Teams integration helps find answers and fix issues without leaving the Field Service app. It also lists team members that have previously worked on a work order.


This feature is part of the 2024 wave 1 release plan for Dynamics 365 Field Service and is expected to be available for public preview in August 2024.


It's designed to save guide on setting up and using this feature, you can refer to the official Microsoft documentation.


That's it for today.


I hope this helps.


Malla Reddy Gurram(@UK365GUY)
#365blogpostsin365days


Friday 12 April 2024

{How to} Increase control when attaching to data in Dataverse on Customer Insights - Data

Hello Everyone,


Today  I am going to share my thoughts on how to increase control when attaching to data in dataverse.


Let's get's started.


Certainly! The Microsoft Dataverse connector has undergone significant improvements, granting you more control and flexibility when importing data into customer insights -data. Here are the key enhancements.


1. Performance Improvements:


You can now smoothly import large dataverse tables into Customer Insights - Data, eliminating previous scale and performance limitations.


The connector has been optimized to handle substantial data volumes efficiently.


2. Selective Table Import:


Say goodbye to mandatory read-only table selections. with the updated connector, you decide which dataverse tables you want to use in Customer Insights.


3. Column-Level Customization:


You have full control over column selection. Choose the specific columns you want to process and output in Customer Insights.


In summary, the Microsoft Dataverse connector is now the fastest and easiest way to bring data from Dataverse into Customer Insights - Data.


Enjoy the newfound flexibility.


That's it for today.


I hope this helps.


Malla Reddy Gurram(@UK365GUY)
#365blogpostsin365days


Thursday 11 April 2024

How to block IP Address from accessing Dataverse in Dynamics 365 Environment

Hello Everyone,


Today I am going to show how to block the IP address from accessing the Dataverse.


Let's get's started.


Suppose users might be looking to download data from tools like Excel or Power BI or try to access Dataverse from different network,Or if the user is trying to access the dataverse from public IP like Coffee shop or Open workspace thenif there no restrictions in place then users able to access the data as usual.


Then how do we restrict it?


Login into Power Platform Admin Center.


Go to the environment : Settings : Privacy + Security


Then : IP address settings:


Enable IP address based firewall rule - which is currently in preview.


Paste the allowed List of IPv4 ranges separated by comma(,)


Also Select the Allowed list of Service Tags from the dropdown.


That's it for today.


I hope this helps.


Malla Reddy Gurram(@UK365GUY)
#365blogpostsin365days


Wednesday 10 April 2024

Set privacy preference on Dynamics 365 CE Environment

Hello Everyone,


Today I am going to show how to set the privacy preference on Dynamics 365 CE environment.


Let's get's started.


Suppose when you are accessing the Dynamics 365 CE environment and you may get errors popped up on the screen and there are some options available to the user like:


1. Ask the user for permission to send an error report to Microsoft

2. Automatically send an error report to Microsoft without user interaction.

3. Never send an error report to Microsoft.


How do you set that?


Login into Power Platform Admin Center.


Go to Settings: Privacy + Security


Privacy Preferences : Turn ON the show privacy statement link for this organisation.


Then default action to take when an error occurs:


Choose one of the options from the above and SAVE the changes.


That's it for today.


I hope this helps.


Malla Reddy Gurram(@UK365GUY)
#365blogpostsin365days


Tuesday 9 April 2024

{Customer Insights} Advanced bot protection for integrity of data

Hello Everyone,


Today i am going to share my thoughts on the advanced bot protection for integrity of data on customer insights.


Let's get's started.


Advanced bot protection is a crucial aspect of ensuring the integrity of data and operational efficiency. Let's delve into how it enhances reliability and safeguard your business processes.


1. Enhanced Data Accuracy:


By implementing advanced bot protection, you can improve the quality of your insights. The data you collect will be more accurate, representing genuine human interactions.


This reliability extends to your decision making processes, allowing you to make informed choices based on trustworthy information.


2. Minimized Disruptions:

Malicious bots can wreak havoc by inflating engagement metrics, triggering journeys incorrectly and skewing analytics.

With bot protection, you can elevate the customer experience by minimizing disruptions caused by these nefarious bots.


3. Specific Features:

Prevent Bot Clicks on Emails:  Avoid inflated engagement metrics, incorrectly triggered journeys and skewed analytics by ensuring that only legitimate clicks are recorded.


Protect Web form submissions: Web forms are often targeted by bots submitting spam or malicious content. Bot protection ensures that only valid form submissions are recorded.


Accurate Event Attendance: Prevent false inflation of event attendance metrics by ensuring that only real attendances are recorded.


Remember, this advanced bot protection not only bolsters your insights but also contributes to a smoother customer experience.


That's it for today.


I hope this helps.


Malla Reddy Gurram
#365blogpostsin365days


Monday 8 April 2024

{Model Driven App} How to enable In-app notifications

Hello Everyone,


Today I am going to show how to enable In-app notifications on Model Driven App.


Let's get's started.


In app notifications on Model Driven App?


In-app notifications allows you to receive notifications on the notificcation center of model driven app.


Normally notifications are stored until you dimiss them or when they expire.


By default notifications expires in 14 days but sys admin can modify the expiration date.


Note: you can only see the notifications when you are using an app.


Notifications are at the organization level so you will see notifications in the app you're using for all appso in your environment.


How do you turn on in your environment?


Login into PPAC(www.admin.powerplatform.microsoft.com)

Choose your environment and settings:

Collaboration:


In-app notifications = ON.


Save the changes.


That's it for today.


I hope this helps.


Malla Reddy Gurram(@UK365GUY)
#365BlogPostsin365Days


Sunday 7 April 2024

{Model Driven App} How to switch to classic buttons in Power Apps

Hello Everyone,


Today I am going to show how to switch to classic buttons in Power Apps.


Let's get's started.


With the modern UI usage of Model Driven Apps sometime the users are want to switch back to classic UI, as the classic app, forms and view designers are deprecated.


You need to enable manually from settings.


Login into PPAC(www.admin.powerplatform.microsoft.com)


Choose the environment,


Then settings - Behavior:


Show the switch to classic buttons in Power Apps - ON


Save the changes.


That's it for today.


I hope this helps.

Malla Reddy Gurram(@UK365GUY)
#365BlogPostsin365Days


Saturday 6 April 2024

{Modern Driven App} How to enable Advanced Mobile offline settings

Hello Everyone,


Today I am going to show how to enable advanced mobile offline settings for model driven apps.


Let's get's started.


Advanced Mobile offline settings for model driven apps?


When there is a mismatch of data between client and server, conflict errors occurs. By default, changes that are made by a user in offline mode are automatically synced to the server when the user is back online.


When enabled, the server wins over the client and the conflict errors must be resolved manually.


Login into PPAC(www.admin.powerplatform.microsoft.com)


Select the environment and click on the settings:


Features:


Advanced mobile offline settings for model driven apps - ON 


Save the changes.


When there is a mismatch of data between client and server, conflict errors occurs. By default, changes that are made by a user in offline mode are automatically synced to the server when the user is back online.


When enabled, the server wins over the client and the conflict errors must be resolved manually.


That's it for today.


I hope this helps.

Malla Reddy Gurram(@UK365GUY)
#365blogpostsin365days