Saturday, 30 September 2023

{Do you know} How many activity types needs to be activated per table?

Hello Everyone,


Today i am going to share how many activities types needs to be activated per table in Dynamics 365 CE Apps.


Let's get's started.


Have you ever faced delay in loading the timeline?


It is yes then according to Microsoft Selecting more than 10 activity types will slow down your timeline.


So always try to choose below 10 activity types per table.


That's it for today.


I hope this helps
Malla Reddy Gurram(@UK365GUY)
#365BlogPostsin365Days


Friday, 29 September 2023

{How to} set up Guided Channel Setup in Dynamics 365 Customer Service

Hello Everyone,


Today i am going to show how to set up Guided Channel Setup in Dynamics 365 Customer Service.


Let's get's started.


Suppose you want to configure how the customers can contact your business either Email or Case in Dynamics 365 Customer Service.


How do you do that?


Login into Customer Service Hub an choose the Customer Service Admin Center.


Then click on the Guided channel Setup.


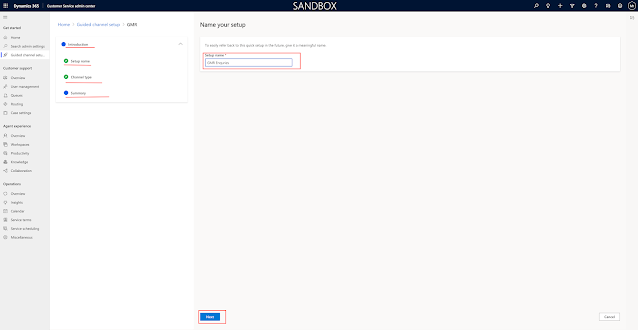
There are 4 steps which needs to be fulfilled in order to complete the set up.


1. Introduction
2. Setup name
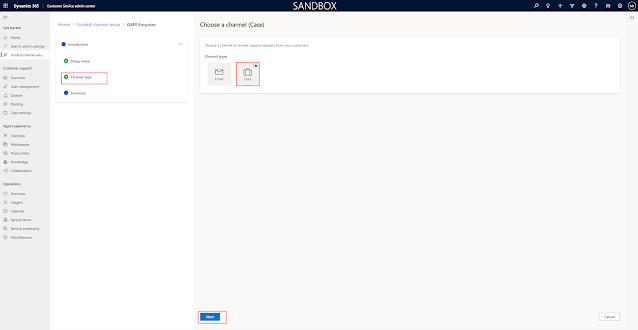
3.Channel type
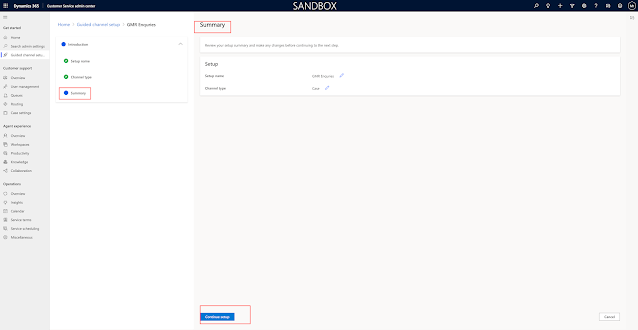
4. Summary


Setup name: Give it a name for the Channel and click next.


Channel Type: Here you can select either Email or Case and click next.


Summary: you can see the setup name and channel type and click on Continue Setup.


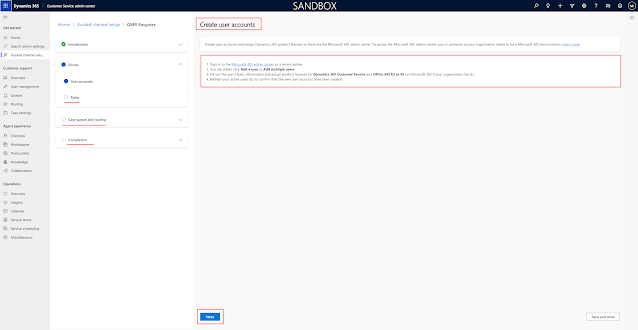
Then it will prompt with Create User Accounts and assign  Dynamics 365 Product licenses to them via the Microsoft 365 Admin Center. To access the Microsoft 365 Admin Center, you or someone at your organizations needs to be a Microsoft 365 tenant admin.


Once you fulfil all the configuration steps, click NEXT.


Next steps to complete are:


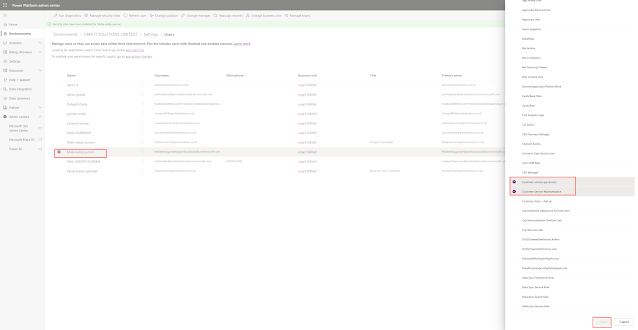
1. Roles
2, Case Queue and routing
3. Completion.


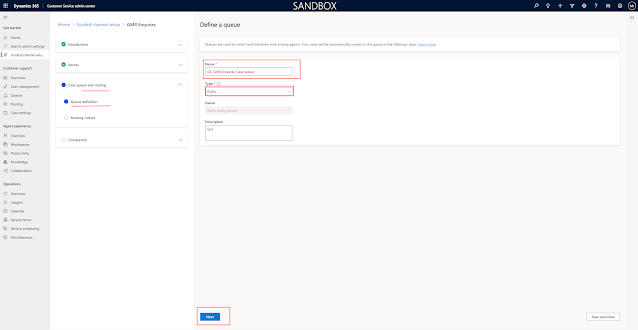
Now you need to define a queue: Name, type as public or private, owner, description and click NEXT.


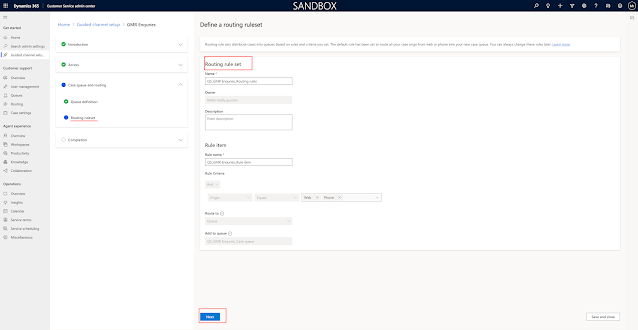
Define a routing ruleset:


Name, Description, Rule name, criteria, route to, add to queue and click Next.


Final step to completion:


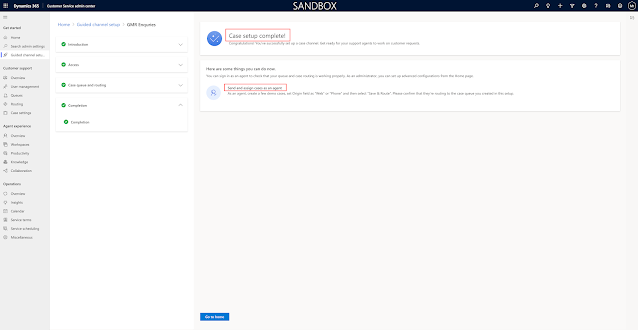
You can sign as an agent to check that your queue and case routing is working properly.

As a administrator, you can set up advanced configurations from the home page.


That's it for today.


I hope this helps.

Malla Reddy Gurram(@UK365GUY)
#365BlogPostsin365Days

Thursday, 28 September 2023

{How to} enable case forecasting(Preview) in Dynamics 365 Customer Service

Hello Everyone,


Today I am going to share how to enable case forecasting in Dynamics 365 Customer Service.


Let's get's started.


Login into Dynamics 365 and choose Customer Service admin center App.


Case forecasting(preview)


Manage configuration for case forecasting. At least 2 weeks of historical case records are required to generate a forecast.


Enable case forecasting = ON.


Basic forecasting configuration:


Forecasting schedule: Select which day in a month to trigger the refresh. The changes to this setting will take effect starting from the next calendar month in your selected time zone.


You can set the refresh for every week.


Time zone for daily forecasting:


Select the time zone to use for daily forecasting. The changes to this settings will take effect starting from next scheduled refresh.


Historical data start date is optional and you can set if you want one.


Seasonality:  The AI model can automatically detect regular holidays and events from historical data. if you have holidays or events scheduled on different dates from the past, you can schedule it in Holiday Calendar and use it to guide the AI model when generating forecasting. The changes to this setting will take effect starting from next scheduled refresh.


Turn on Use scheduled from Hoilday Calendar.


That's it for today.


I hope this helps.

Malla Reddy Gurram(@UK365GUY)
#365BlogPostsin365Days


Wednesday, 27 September 2023

{How to} turn on unified routing in Dynamics 365 Customer Service

Hello Everyone,


Today i am going to show how to enable unified routing in Dynamics 365 Customer Service.


Let's get's started.


Login into Dynamics 365 and choose the Customer Service Admin Center App.


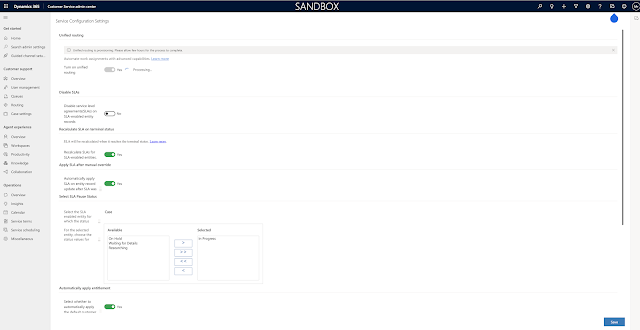
Turn on the Unified Routing  =  ON


For more information about the benifits and prequisites click Here


That's it for today.


I hope this helps

Malla Reddy Gurram(@UK365GUY)
#365BlogPostsin365Days


Tuesday, 26 September 2023

{How to} Enable Enhanced Full Case Form in Dynamics 365 Customer Service

Hello Everyone,


Today I am going to share what is the significance of  Enhanced Full Case Form in Dynamics 365 Customer Service.


Let's get's started.


In the Dynamics 365 Customer Service - Agents create and work on multiple cases and need to switch between multiple screens to view customer details or refer to past cases and prior interactions.


At the moment agents can upload attachments and capture notes during case creation.


This type of capturing information on case form is unnecessary repetitive tasks.


So Agents need an intutitive case form that allows them to find the relevant information and perform operations quickly.


New Enhanced Full Case Form have:


Can upload the attachments on separate section with great visibility, description  field with RTE capabilities to capture rich case details.


You can add key information without losing sight of customer details, past cases, and previous inteeractions, this will avoid case duplication.


You can add notes during case creation.


Access all the attachments related to a case in a consolidated view.


How to activate ENHANCED FULL CASE FORM?


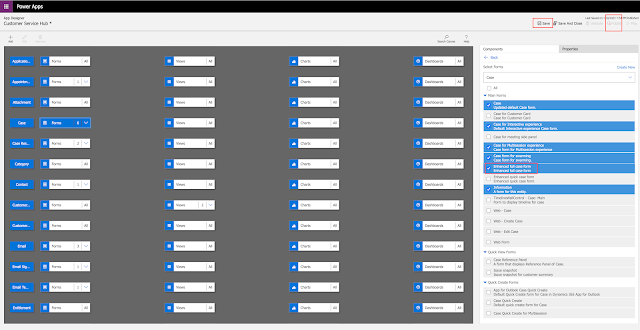
Login into Dynamics 365  Customer Service Hub.


Open the site map of the customer service hub and check the box of the enhanced full case form.
and save and publish the changes.


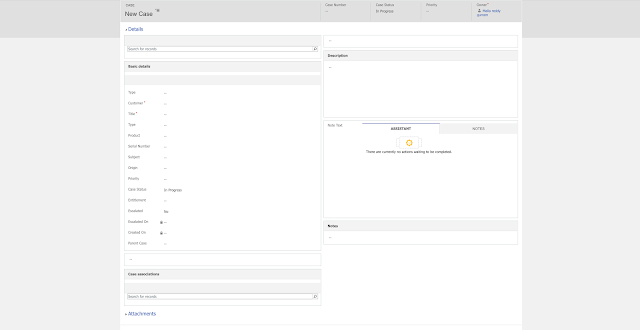
Now open the case form and choose the enhanced full case form.


Now you case see the attachment section, description and notes.


That's it for today.


I hope this helps

Malla Reddy Gurram(@UK365GUY)
#365BlogPostsin365Days


Monday, 25 September 2023

Set Advisor Program Preview in Dynamics 365 CE Apps

Hello Everyone,


Today i am going to show how it looks when an advisor program is enabled in your organisation.


Suppose if your organisation is enabled the Advisor Program(Preview) feature in your organisation so when a user from the advisor program logins in then the user will be prompted with a slide whether you want to volunteer to help other makers at your organisation.


The user has to be click the notification as available so makers can contact the user for help when creating Power Apps.


In the settings:


Set the language and time, notification like the newsletter with tips and offers about the power apps, Directories you can choose if you are in multiple organisations.


Advisor Program(PREVIEW) Set the availability and communication method as either email or Microsoft Teams.


That's it for today.


I hope this helps.
Malla Reddy Gurram(@UK365GUY)
#365BlogPostsin365Days


Sunday, 24 September 2023

{How to} use Distill Web Monitor on Dynamics 365 Apps

Hello Everyone,


Today  i am going to show how to use DISTILL WEB MONITOR on Dynamics 365 Apps.


Let's get's started.


Suppose you have a requirement to monitor a solution deployment then how do you normally do that by visiting frequently on the browser.


Now with the DISTILL WEB MONITOR you can enable the tool and monitor your deployment on it.


Download tool from here


Open your environment where you want to monitor and click on the distill web monitor tool on chrome browser.


Once you save your selection then the new window will open and you can monitor the application.


That's it for today.


I hope this helps.
Malla Reddy Gurram(@UK365GUY)
#365BlogPostsin365Days


Saturday, 23 September 2023

{How to} add custom button on the ribbon button on Dynamics 365 CE Apps using XRMTOOLBOX

Hello Everyone,


Today i am going to show how to add custom button to the ribbon on Dynamics 365 CE Apps using XRMTOOLBOX.


Let's get's started.


Suppose you have a requirement to add a report to the custom button on the Dynamics 365 CE App.


How do you that?


Open XRMTOOLBOX and connect to your environment and add the solution into it.


Drag the button the menu and give it a name and publish, all changes will appear on the ribbon solution and appear on dynamics 365 CE App, you can add additional functionality to it like open a power bi report with script.


That's it for today.


I hope this helps.
Malla Reddy Gurram(@UK365GUY)
#365BlogPostsin365Days

Friday, 22 September 2023

{How to } generate ribbon metadata in Dynamics 365 CE Apps

Hello Everyone,


Today i am going to show how to generate ribbon metadata in Dynamics 365 CE Apps.


Let's get's started.


Suppose you have requirement of issue ribbon command bar often casused by missing or incorrect ribbon metadata.

A button on the command bar is hidden when it should be visible.
A button on the command bar is visible when it should be hidden.
A button on the command bar is not working correctly.


A command checker can help but the system administrator or customizers or makers with permissions can use it.


How to start the regeneration?


You can use the command checker tool to start the regeneration of ribbon metadata.


URL. For example: https://yourorgname.crm.dynamics.com/main.aspx?appid=<ID>&ribbondebug=true.


Open your sales hub and place the &ribbondebug=true at the end of the url and then new button will appear on the ribbon(refer to above screenshot).


When you click on the new ribbon button then the regeneration ribbion metadata will be displayed where you can generate metadata and compare it.


When you click on the regenerate ribbon metadata button it will take around 15 minutes to generate 


You can check the status of the operation status from the solution history:


Click on the advanced settings > Solution History and Ribbon Metadata Generation Operation.


RibbonMetadataGeneration operation is completed successfully:


That's it for today.


I hope this helps.

Malla Reddy Gurram(@UK365GUY)
#365BlogPostsin365Days


Thursday, 21 September 2023

{How to} see sales usage reports on Dynamics 365 Sales Hub

Hello Everyone,


Today i am going to show how to see the sales usage report on Dynamics 365 Sales Hub.


Let's get's started.


Login into Sales Hub.


Choose the Sales from settings.


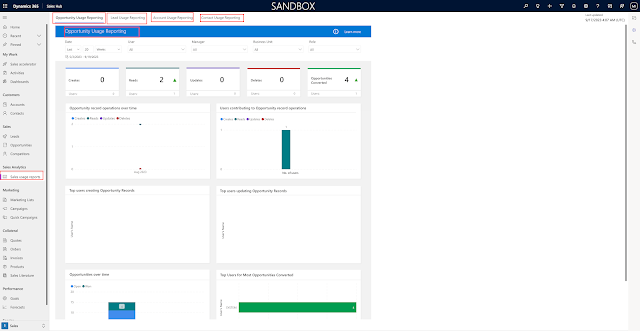
Under the Sales Analytics click on Sales Usage Reports.


Opportunity Usage Reporting:

Opportunity record operations over time, Users Contributing to Opportunity record operations.
Top users creating Opportunity records, Top users updating Opportunity records, Opportunities won, Top users for most opportunities converted.


Lead Usage Reporting:

Lead record operations over time, Users Contributing to Lead record operations.
Top users creating Lead records, Top users updating Lead records, Lead won, Top users for most Lead converted.


Account Usage Reporting:

Account records operations over time, users contributing to account record operations, Top users creating account records, top users updating account records.


Contact Usage Reporting:

Contact record operations over time, Users contributing to contact record operations, Top users creating Contact Records, Top users updating Contact Records.


That's it for today.


I hope this helps.

Malla Reddy Gurram(@UK365GUY)
#365BlogPostsin365Days.


Wednesday, 20 September 2023

{Did you know} Modern security role editor experience in the Power Platform admin center

Hello Everyone,


Today i am going to share how to use the Modern security role editor experience in the Power Platform Admin Center.


Let's get's started.


Choose the environment and then settings;


New window will be displayed with all the security roles and some noticable changes like display only parent security roles to toggle turn ON by default where you can be displayed  only parent security role(root level) or you can turn it off.


Also you can still go to Legacy UI for security roles on the command bar.


When you select the security role and click on the "..." you can edit the security role


Once you click on the edit button then new modern security role editor will be displayed.


That's it for today.


I hope this helps.

Malla Reddy Gurram(@UK365GUY)
#365BlogPostsin365Days


Tuesday, 19 September 2023

{How to} refresh Power BI Report Datasets on Power BI Service

Hello Everyone,


Today i am going to show how to refresh the Power BI Report datasets on Power BI Service.


Let's get's started.


Choose the the Power BI 


Then you will land on POWER BI Workspace and select the report and click on refresh icon.


That's it for today.


I hope this helps.

Malla Reddy Gurram(@UK365GUY)
#365BlogPostsin365Days


Monday, 18 September 2023

{How to} to set Focused View for tables in Dynamics 365 Sales

Hello Everyone,


Today I am going to show how to set Focused View for tables in Dynamics 365 Sales App.


Let's get's started.


Login into Sales Hub.


Select the table like Lead , Opportunity, Account, Contact.


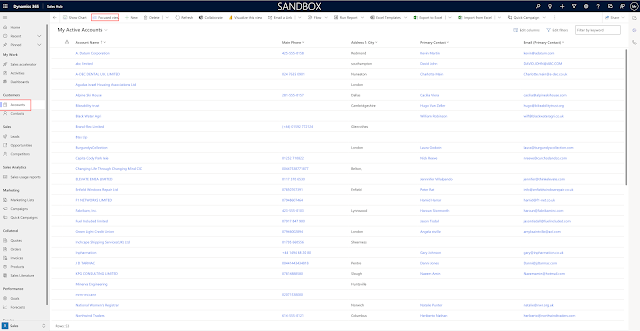
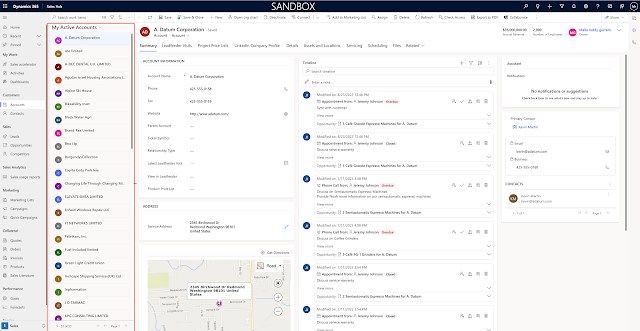
Click on account table and then  click on the Focused view.


Now you have the visibility of the table and stay focused on the tables you are working.


That's it for today.


I hope this helps

Malla Reddy Gurram(@UK365GUY)


Sunday, 17 September 2023

What do you mean by Microsoft Entra ID in Power Platform

Hello Everyone,


Today i am going to share what is Microsoft Entra ID in Power Platform.


Let's get's started.


Enlarge the Admin Centers and you will see the Microsoft Entra ID.


You may be wondering what is all about Microsoft ID - otherwise known as Azure Active Directory 😁


A new name for Azure Active Directory, you can continue to use the Azure AD without any disruptions. All existing deployments, configurations and integrations will continue to function as they do today.


For more information click here


That's it for today.


I hope this helps.
Malla Reddy Gurram(@UK365GUY)


Saturday, 16 September 2023

How to configure Power Apps Assets within Power Apps Admin Center

Hello Everyone,


Today i am going to share what is the significance of Power  Apps Assets in Power Apps.


Let's get's started.


Normally when working with Power Apps you can get stuck in a problem and with the help of AI, you can get some answers.


But in some critical cases bot fail to give accurate answers for you.


To over come situation Microsoft introduced Power Apps Assets.


As the name itself is advisors, so it lets you configure the experts in your organisations so that the users can contact them if they are stuck anywhere.


You can configure as many advisors as possible no limitation.


The steps to configure Power Apps Assets - Advisor - you have to follow these below two points.


1. Internal Resource Links


2. Advisors.


Manage links to internal Power Apps documentation and community channels, as well as Power Apps advisors who wish to help other makers.


Internal resource links:


Documentation:  You can provide the documentation url which might help when you got to do troubleshoot issues.


Team Group:  You can insert the Microsoft Teams group link here when in troubleshooting you can use the Microsoft Teams group to ask for help.


Yammer Community:  Similarly you can also provide the yammer community link  in the event of issues you can ask questions.


Once you have provided the url's for these and then save the changes.


Go to next TAB called Advisors:


Configure as many advisors as you can, in the event of help required.


How the advisors will help?


Advisors when they login into Power Platform Admin Central they will get notification whether they can help or not based on their choice.


That's it for today.


I hope this helps.

Malla Reddy Gurram(@UK365GUY)
#365BlogPostsin365Days