Thursday, 19 December 2019

{Do you know}Power Apps What has been changed from October 2019

Hello Everyone,

There has been a lot of changes happening on Power Platform.

Some of the changes reflects from October 2019 and what is changing in December 2019.

Please check in the below table for quick reference.


I hope this helps.

For Microsoft Dynamics 365 Consultancy|Power Apps|Training|Support|Licensing|Web Hosting|Websites

Wednesday, 18 December 2019

{Know How} Dynamics 365 for Project Service App is missing when Production copied on to the Sandbox Environment

Hi Everyone,

As Microsoft is transitioning from Legacy Dynamics 365 Admin Center to the Power Platform Admin Center.

So this morning i am helping one of our customers with setting the new environment(Sandbox).

I have copied Production Environment and set the Sandbox environment with full copy including all customizations and data schemas.

You can refer to the Microsoft Docs from here

Once target environment is successfully configured make sure you disable administrative mode and remove any outlook synchronization with the exchange as only one environment is integrated with outlook to avoid the email and activities being copied on to the both (Production and Sandbox) environment.

So i have tried to open the newly created Sandbox environment and i have noticed only, sales, service, marketing apps installed on to the SANDBOX environment.

Project Service Automation and Field Service Application are missing from the Sandbox Environment.

There is a work around to get the missing application installed on the sandbox environment.

So lets gets started..

Go to the Power Platform Admin Center click here 

https://admin.powerplatform.microsoft.com/environments

Select the Environment effected as below screen shot.


then you will redirected back to the old Dynamics 365 Applications area see below image..


Select the Project Service Automation Application which is not installed and click install.
Accept terms and conditions of Microsoft.


Once you clicked on install it will take about 15 minutes to install the app on the targeted environment.

Finally you will see app on the admin center.


I hope this helps.
For Microsoft Dynamics 365 Consultancy|Power Apps|Training|Support|Licensing|Web Hosting|Websites

Tuesday, 10 December 2019

{Create PDF have no options available on Dynamics 365 for Sales Unified Interface}

Hello Everyone,

Today i am going to share quick tip on how to view options when an Quote is created and clicked on "Create PDF or Email as PDF", if no option available.

So let's gets started.

Scenario: when a lead is qualified and Opportunity created, add products and create Quote, send Quote to the customer as PDF via email.

Check below image where Create PDF and Email as PDF.

When you click on Create PDF - No Options Avaiable..

Why you are not able to see because system administrator did not defined any template for the Quote Entity.

How can you achieve that?

Go to Dynamics 365 for sales Unified Interface and click on Settings and select "Advanced Settings"

- Templates -> create New Template for the Quote Entity and then you will be able to see template on the Quote -click on  Create PDF -Options -> Quote Summary.

Same you can create Email as PDF as well.

I hope this helps.

For Microsoft Dynamics 365 Consultancy|Power Apps|Training|Support|Licensing|Web Hosting|Websites


Thursday, 5 December 2019

{Power Virtual Agent at a Glance Part 2 on Live Website}

Hello Everyone,

As you read my previous blog post related to the introduction of  "Power Virtual Agent" and how we can use the Bot on Demo Website.

Today i am going to show you how to use the Chat Bot on Live Website.

Let's gets started.

Scenario: Suppose you are running a company which sells computers online, allocating a customer service agent for communicating with the online users is time consuming and too much waste of time for the business, as you never know when the customers will land on the website and inquiry about the computers they are interested in.

So we can have a Chat Bot configured via "Virtual Agent" and simply copy the html code and paste it on your live website.

Currently i am using WordPress Website show you the Demo.

Log in into your Virtual Agent and configure the "Topic"


Then publish the "Topic" and copy the code to paste it on the live website.


then  publish your website page on your WordPress Website.

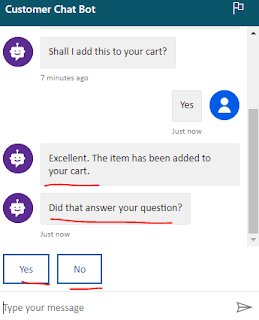
As you can see the user typed as " I am a home user" then Bot came up with set of questions click yes or no.

If answer "Yes" was selected then the Bot would add the product to the cart, as i have mentioned that company sells computers so if "yes" is given then the Bot will add the home user computer to the cart.


Then Bot will ask " did that answer your question, if the user clicks on "Yes" then the above message will be populated for rating and any more help needed.

If the user clicks No thanks, then the below message will be populated.


I hope this helps.

Stay tuned to my blog and i will be blogging series of the post on "Power Virtual Agent".


For Microsoft Dynamics 365 Consultancy|Power Apps|Training|Support|Licensing|Web Hosting|Websites

Wednesday, 4 December 2019

{October wave 2 release bug on Make Price List Optional when product added to Opportunity on web client}

Hello  Everyone,

Today i was working on new solution for customer where the requirement is to add the products to the opportunity record without "price list".

As we know Microsoft have released new features in October Wave 2 release, in that release there is a new feature which will allow the user to add products to the opportunity without adding the price list.

Let's see this in action.

Go to Sales > Opportunity > New Opportunity

Fill the mandatory fields like "Topic" and then save the Opportunity record.


Try to add "Product" to the opportunity by clicking on the "+" sign...

You will see "You must select the price list before you select the product" pop up.

We need to make changes to system settings to get work on Unified Interface, Please follow along.

Go to Settings > Administration > System Settings >


Now we have configured the system settings.. lets see this scenario on the Unified Interface.

Open the Dynamics 365 Sales Hub,Once Unified Interface is opened then click on the Opportunities..


Now opportunities view will be displayed and click on "NEW" Opportunity..fill value in "Topic" field and save opportunity..


Then click on the "Product Line Items tab after "Summary" Tab..


Once you click on the "+ add product" new page will be displayed related to the Product record.
As we have made changes on the system settings, so in the Unified Interface App is not asking the user to enter the Price List and it is allowing to add the product to the opportunity.


Cool thing is now you can write  new product with "Active stage", in order to create new product from product window itself, we need to make system settings change, see below image.

Settings > Administration >  System Settings


So we are able to create new product and add the price for the product creating and discounts etc..


So you can drive through the sales cycle accordingly like create quote, order & invoice.

I hope this helps.

For Microsoft Dynamics 365 Consultancy|Power Apps|Training|Support|Licensing|Web Hosting|Websites

{Power Virtual Agent at a Glance}

Hello Everyone,

Today i am going to look at  Power Virtual Agent which is generally available now for everyone. 

Another App for Power Platform family, As we know, Power Apps, Power Automate, Power BI and now its Power Virtual Agent.


Power Apps no code low code platform for citizen developers.

Power Virtual Agent is generally available now and price for it will be around $1000 per month per 2000 sessions per Tenant.
  

What is Power Virtual Agent? 

Well its simple Bot Framework with no code and allows us to engage with customers and employees, you name it and Power Virtual Agent will be there to communicate with them virtually and convey the message to the internal teams via Power Automate and Cognitive Services.


With the Power Virtual Agent we can resolve common problems without staff agent and saving the time and cost where the customer service agent can be utilized in more efficient way.

Things can be achieved using the Power Virtual Agent are:
1. Create a virtual Agent on your own with simple steps.
2. Empower Virtual Agents
3. Measure the performance of the Bot with Power BI.


So i have tried a simple Bot Power Virtual Agent which will answer to the users inputs, lets consider an example:

 Managed Service Provider have configured a Virtual Agent Bot.


I have created a simple Bot for Demo Website which will trigger answers based on the questions raised by the user.

Some trigger phrases created like 
Hello
Good Morning
Good Afternoon
Good Evening

If the user lands on the Managed Service Provider Website about the Support Contract.

The user simply clicks on the Bot symbol and Virtual Agent will pops up, if the user types inn..


If the user types in "Hi" then Bot automatically fire the set of questions to  the user on the website.

If the user selects the support as GOLD then see what is the answer from the Virtual Agent below.

Bot have responded with answer and asked further information from the user like email, so that with the Power Automate one of the consultant will get in touch with the user on the website.

I hope this helps.


For Microsoft Dynamics 365 Consultancy|Power Apps|Training|Support|Licensing|Web Hosting|Websites

Sunday, 1 December 2019

Auto populate contact and account details when New "lead" record is created

Hello Everyone,

With the release of wave 2 October 2019, there is a new feature added to Dynamics 365 Apps for UCI only.

One of my client have a requirement to auto populate the contact and accounts data when filling the existing contact and account fields on new "lead" record created.

They are still using the Web client of Dynamics 365 Sales Application.

Lets see this in action.

Dynamics 365> Sales > Lead > New Lead

Fill the Business Process Flow of Qualify stage fields, see below image:


Once you fill in those fields on Business Process Flow and the associated Lead record fields will be auto populated.

Now i have selected the existing contact field from lookup then the  "Name", "Job Title", "Telephone", "Email" fields auto populated


Similarly fill the account field  on the lead form and Company field is auto populated.


But if you need to fill rest of the fields of "company" like website and address fields then you need to write workflow or script to auto populated.

I hope this helps.


For Microsoft Dynamics 365 Consultancy/Training/Support/Licensing/Web Hosting/Websites

Monday, 18 November 2019

How to add email template from Dynamics 365 App for Outlook

Hello Everyone,

It's been while i haven't blogged about Dynamics 365 Customer Engagement.

Now i have some spare time where i can share a feature on the Dynamics 365 App for Outlook.

A lot of Dynamics 365 Customer Engagement end clients had a requirement of sending same type of emails to their on boarded customers, so composing the same email for customers is a lot of manual task and time consuming.

There is a feature on Dynamics 365 App for Outlook, when composing an email you can add the email template and that template will pick up the contact information from Dynamics 365 and email is composed automatically with all the details.

You can add following to your email body:
1. Add Template
2. Add Sales Literature
3. Add Knowledge Articles

so let's see "Add Template"  in action..

Open your Outlook( i assume your outlook have Dynamics 365 App for outlook is in Sync.. if not you need to enable your mailbox in Dynamics 365 Customer Engagement.


Once you open the Outlook click on new email to send out the email to your customer for on boarded welcome email.

Insert the "To" email and click on the Dynamics 365 Icon.
"Make sure the recipient should be in Dynamics 365 as lead, contact or user otherwise App will not allow to add the template document."

Now choose the template which you will get as default email templates or you can design new template and upload to the Dynamics 365 if you have a permissions otherwise you can request Dynamics 365 System Administrator to help with import the template for you.

Click on the "Select" template and select the template you want add to the email, for example i have chosen "Thank you for registering with us" email template..

Now you will see the chosen template and click "add to email" see below screen shot.


Once you click on the "Add to Email" email template will be added to the body of the email and  you want to make any changes to the email on the body section you can and send email to your contacts.

I hope this helps.
For Microsoft Dynamics 365 Consultancy/Training/Support/Licensing/Web Hosting/Websites

How to add and filter an entity and views on Dynamics 365 App for Outlook

Hello Everyone,

Today i am going to share quick tip of how to add an entity and filter views on Dynamics 365 App for Outlook.

You know what i am referring to, ok you got it ?  if not see below screen shot..


So there might be requirement to only show certain entities and view and hide unnecessary entities to the Dynamics 365 App for Outlook users.

In that situation we can modify the site map of the "Dynamics 365 App for Outlook".

Go to the Settings > Customizations > Customize the system > Model driven Apps > Double click on the Dynamics 365 App for Outlook..

Refer to the below screen shot.


Once you double click on the Dynamics 365 App for Outlook.. Sitemap will be opened and click add(+) then select the entity you want to add,
for instance i will add "Quote" and check box " add all assets" and click on the Views you want to show on the Dynamics 365 App for Outlook..

Refer to the below screen shot..

Select the "Quote" entity and check the " Add All Assets".

Now you can change the views as well see below screen shot.

Click on the view and select "All" check box.

Now "Save and Close".


I hope this helps

For Microsoft Dynamics 365 Consultancy/Training/Support/Licensing/Web Hosting/Websites
Contact us: https://www.gmrit-solutions.com

Thursday, 17 October 2019

How to uninstall Microsoft Portals and Install again

Hello Everyone,

Today i am going to share a scenario, due to some reasons if you want to reinstall Microsoft Portal on your Dynamics 365 Environment, you achieve a clean reconfiguration in couple of ways.

1. Restart provisioning
2. Change configuration and retry
3. Reset portal
4. Uninstall all the Microsoft Portal Solutions.

So i am not going to discuss about the first three points here as everyone is familiar with it,as i have shared a screen above.

Lets discuss about the Microsoft Portal solutions uninstall, this task should be carefully done otherwise you may end up in bad situation.

Firstly you need to get to know what solutions needs to be deleted from the Dynamics 365 Solutions.
Follow the blog this blog post by Jon Birnbaum 

You might be wondering how to construct  the fetch xml of the solutions.

Its so simple you might get it from the customization's area of the Dynamics 365. 
Settings > Customizations >  Organizations service..


Construct the url by using the blog provided above or for your convenence i am showing below:

https://[orgname].crm[x].dynamics.com/api/data/v8.[x]/solutions?fetchXml=<fetch mapping='logical'><entity name='solution'><attribute name='installedon'/><attribute name='friendlyname'/><order attribute='installedon' descending='true'/><link-entity name='publisher' to='publisherid'><attribute name='customizationprefix'/><filter type="and"><filter type="or"><condition attribute='customizationprefix' operator='eq' value='adx' /><condition attribute='customizationprefix' operator='eq' value='msa' /></filter></filter></link-entity></entity></fetch>

Place the orgname to your dynamics 365 url and paste this url on the browser and you will get the following solutions list like below.

{"@odata.context":"https://gmritsolutions.api.crm11.dynamics.com/api/data/v9.1/$metadata#solutions(installedon,friendlyname,solutionid)","value":

[{"@odata.etag":"W/\"6694851\"","installedon":"2019-04-16T20:45:54Z","friendlyname":"Common Data Service Starter Portal (Preview)","solutionid":"45f03a00-8f20-416d-84ac-d4b42335be29","publisher1.customizationprefix":"adx"},

{"@odata.etag":"W/\"6654090\"","installedon":"2019-04-16T20:18:31Z","friendlyname":"Dynamics 365 Portals - Portal base","solutionid":"3e1103ed-03dd-40ea-ad09-86307e9f76f5","publisher1.customizationprefix":"adx"},

{"@odata.etag":"W/\"6612642\"","installedon":"2019-04-16T20:12:39Z","friendlyname":"Dynamics 365 Portals - Portal dependencies","solutionid":"df0ae7e0-303e-48dc-8505-677fbcf78c0a","publisher1.customizationprefix":"msa"},

{"@odata.etag":"W/\"23476555\"","installedon":"2018-10-27T09:15:11Z","friendlyname":"Dynamics 365 Portals - Customer Self-Service Portal","solutionid":"567ff3d1-decd-4b8f-8e8f-462bd93b4598","publisher1.customizationprefix":"adx"},

{"@odata.etag":"W/\"6689114\"","installedon":"2018-10-27T09:14:12Z","friendlyname":"Dynamics 365 Portals - Azure Storage","solutionid":"27c5fa97-e7cc-4581-b63e-6062c1106a33","publisher1.customizationprefix":"adx"},

{"@odata.etag":"W/\"23476489\"","installedon":"2018-10-27T09:13:09Z","friendlyname":"Dynamics 365 Portals - Knowledge Management","solutionid":"e1b8cbee-2873-4a58-b800-d09c208c1076","publisher1.customizationprefix":"adx"},

{"@odata.etag":"W/\"23462052\"","installedon":"2018-10-27T09:12:46Z","friendlyname":"Dynamics 365 Portals - Customer Service","solutionid":"4dabac1c-f651-4c1f-a832-dad3cff25e3a","publisher1.customizationprefix":"adx"},

{"@odata.etag":"W/\"6694818\"","installedon":"2018-10-27T09:11:56Z","friendlyname":"Dynamics 365 Portals - Timeline","solutionid":"186ee3f5-df46-49c6-b382-51a5e03f51cb","publisher1.customizationprefix":"adx"},

{"@odata.etag":"W/\"23461464\"","installedon":"2018-10-27T09:11:45Z","friendlyname":"Dynamics 365 Portals - Discussion Forums Workflows","solutionid":"af409dd1-695f-4e58-a5b7-7d1bba34ac78","publisher1.customizationprefix":"adx"},

{"@odata.etag":"W/\"23461256\"","installedon":"2018-10-27T09:10:40Z","friendlyname":"Dynamics 365 Portals - Discussion Forums","solutionid":"d40a1f96-4177-4d77-85b6-eae77c50f3a3","publisher1.customizationprefix":"adx"},

{"@odata.etag":"W/\"6687816\"","installedon":"2018-10-27T09:10:11Z","friendlyname":"Dynamics 365 Portals - Feedback","solutionid":"75495799-fdde-4509-af1c-634e2a9a2e02","publisher1.customizationprefix":"adx"},

{"@odata.etag":"W/\"6687068\"","installedon":"2018-10-27T09:08:26Z","friendlyname":"Dynamics 365 Portals - Web Forms","solutionid":"4c86be73-383c-4d29-9c7d-56f09278ce23","publisher1.customizationprefix":"adx"},

{"@odata.etag":"W/\"6666362\"","installedon":"2018-10-27T09:08:12Z","friendlyname":"Dynamics 365 Portals - Identity Workflows","solutionid":"d198f55a-4863-46b6-a1f8-2572be847019","publisher1.customizationprefix":"adx"},

{"@odata.etag":"W/\"6665836\"","installedon":"2018-10-27T09:08:06Z","friendlyname":"Dynamics 365 Portals - Identity System Workflows","solutionid":"67962fc1-b7e5-498f-9a28-b43979a0451c","publisher1.customizationprefix":"adx"},

{"@odata.etag":"W/\"6665576\"","installedon":"2018-10-27T09:07:33Z","friendlyname":"Dynamics 365 Portals - Identity","solutionid":"aafc7111-77d7-42bb-8a69-ede43d058d4f","publisher1.customizationprefix":"adx"},

{"@odata.etag":"W/\"6660262\"","installedon":"2018-10-27T09:07:05Z","friendlyname":"Dynamics 365 Portals - Web Notification","solutionid":"6cb7aa68-9fb6-4105-ba07-ea84b88660df","publisher1.customizationprefix":"adx"},

{"@odata.etag":"W/\"6658857\"","installedon":"2018-10-27T09:06:56Z","friendlyname":"Dynamics 365 Portals - Portal Base Workflows","solutionid":"6e45c281-e54a-47d5-bb18-d370a39ad783","publisher1.customizationprefix":"adx"},

{"@odata.etag":"W/\"6658447\"","installedon":"2018-10-27T09:06:48Z","friendlyname":"Dynamics 365 Portals - Portal Base System Workflows","solutionid":"a6f4f1dc-9f78-405b-b58d-9184766a2c12","publisher1.customizationprefix":"adx"},

{"@odata.etag":"W/\"23443114\"","installedon":"2018-10-27T09:02:03Z","friendlyname":"Dynamics 365 Portals - Portal Base","solutionid":"d0da2c41-8ab6-471c-8067-23e2dd0af27b","publisher1.customizationprefix":"adx"},

{"@odata.etag":"W/\"23382108\"","installedon":"2018-10-27T08:59:37Z","friendlyname":"Dynamics 365 Portals - Portal Dependencies","solutionid":"2b2711c5-0489-48f3-848c-1db5ee9f2a37","publisher1.customizationprefix":"msa"},

{"@odata.etag":"W/\"23357506\"","installedon":"2018-10-27T08:58:37Z","friendlyname":"Dynamics 365 Portals - Bing Maps Helper","solutionid":"cb1d69c2-b5c8-4dca-831c-5df952608517","publisher1.customizationprefix":"adx"},

{"@odata.etag":"W/\"1839080\"","installedon":"2018-10-27T08:58:24Z","friendlyname":"Dynamics 365 Portals - Get Record ID Workflow Helper","solutionid":"19ca57b7-4b06-44fe-bb06-73b2c8ed11fc","publisher1.customizationprefix":"adx"}]}

So you can see from query, there are solutions which have been installed on 2018-10-27 with solutions names.

Carefully delete all the solutions from the Solutions area on the Dynamics 365 Customer Engagement area.

Once you have managed to delete the solutions, then go back to your Dynamics 365 Admin center:

Choose the Instance tab and look for the "Portal" Solution which may not be in the configured state.

Select the portal solution and click on the manage icon, then your portal will start provisioning.


I hope this helps

For Microsoft Dynamics 365 Consultancy/Training/Support/Licensing/Web Hosting/Websites
Contact us: https://www.gmrit-solutions.com

Tuesday, 15 October 2019

No more Dynamics 365, its Common Data Service Application Platform


Hi Everyone,

Its been a while i haven't blogging.

Today i just want to let my blog readers  know that the latest update from Microsoft as there is no more calling as Dynamics 365 instead its now been called as Common Data Service Application Platform.

According to Microsoft October wave 2 2019 release.


Keeping the low code momentum and pro developers can extend the power platform.

You can get the October 2019 wave 2 release notes from below url:
https://docs.microsoft.com/en-us/dynamics365-release-plan/2019wave2/

I hope this helps

For Microsoft Dynamics 365 Consultancy/Training/Support/Licensing/Web Hosting/Websites
Contact us: https://www.gmrit-solutions.com

Wednesday, 14 August 2019

Customer story: RLH Corporation

Discover how Red Lion Hotels Corporation used Dynamics 365, Microsoft Teams, and Office 365 to digitally transform their internal processes to drive higher guest satisfaction. Faced with data-quality issues, the challenges of combining two legacy CRM platforms, and a need to improve internal communications, RLH Corporation consolidated disparate systems into a single platform.

Tuesday, 13 August 2019

Customer story: RLH Corporation

Discover how Red Lion Hotels Corporation used Dynamics 365, Microsoft Teams, and Office 365 to digitally transform their internal processes to drive higher guest satisfaction. Faced with data-quality issues, the challenges of combining two legacy CRM platforms, and a need to improve internal communications, RLH Corporation consolidated disparate systems into a single platform.

Monday, 12 August 2019

Power Platform Automation tools

Hi Everyone,

Today i am going how the power platform automation can be achieved.

As you all know the Power Platform is built on the Common Data Service.

The automation can be done using the


  1. Business Process Flows
  2. Business Rules
  3. Workflows using the classic Common Data Service for Apps workflow engine
  4. Workflows using Microsoft Flow

Business Process Flow: Much like the Classic Web App of the Dynamics 365 first party apps. you can drag and drop the steps and stages according to the business scenario on the Business Process Flow App designer.

Business Rules: Business Rules work on client side and server side of the application, you can use the business rules.

Business rules are built using conditions and actions. The following can be accomplished with business rules:

  • Set field values
  • Clear field values
  • Set field requirement levels
  • Show or hide fields
  • Enable or disable fields
  • Validate data and show error messages
  • Create business recommendations based on business intelligence.

Classic Workflows: Dynamics 365 Customer Engagement Applications  use the workflow for back ground or real time workflow.

 You can see some of the actions below:

  • Create record
  • Update record
  • Assign record
  • Send email
  • Start child workflow
  • Change status
  • Stop workflow

Microsoft Flow: Microsoft Flow is used to connect the third party app with the Common Data Service Connectors, there are around 200 connectors available for the flow.
The main types of flows are:
Automated
Instant
Scheduled
Business process

So based on the above four workflows  the power platform automation can be achieved.

I hope this helps

For Microsoft Dynamics 365 Consultancy/Training/Support/Licensing/Web Hosting/Websites
Contact us: https://www.gmrit-solutions.com

Saturday, 27 July 2019

Microsoft Dynamics 365 Unified Interface Task Flow Feature

Hi Everyone,

We all know about the Unified Interface and anyone still using the web client needs to move on to the Unified Interface.

Today  i am going to share some information about the "Unified Interface" Task flow feature..


With the "Task Flow" you can perform following actions with out manually navigating to the Activities, Opportunities or contact etc..

After Meeting:
Use this task flow to update your appointment and related records after your meeting is over.

Follow up with Opportunity:
Use this task flow for quick communication with your customer. Access key information about your potential customer.

Update Contact:
Use this task flow to quickly update contact information, including business and personal details.

I hope this helps.

For Microsoft Dynamics 365 Consultancy/Training/Support/Licensing/Web Hosting/Websites
Contact us: https://www.gmrit-solutions.com

Tuesday, 16 July 2019

Microsoft Inspire 2019 Watch the Corenotes live from Microsoft Inspire in Las Vegas, NV.

Hi Everyone,

Every year Microsoft conduct the Inspire program exclusively Microsoft Partners.

Microsoft Inspire will give Partners gets world recognition from their achievements throughout the year.

Microsoft rewards best partners with "Microsoft Partner of the year award".

Also Partners gets the opportunity to get together and networking with other partners.


Technology investments and recognition of the partners who have developed new solutions on top of the Dynamics 365, Power Apps, Power BI, Azure etc..

Catch up the live event show from here

I hope this helps.

For Microsoft Dynamics 365 Consultancy/Training/Support/Licensing/Web Hosting/Websites
Contact us: https://www.gmrit-solutions.com


Monday, 15 July 2019

Microsoft Dynamics 365 CE How to turn off smart matching completely

Hello Everyone,

There are situations clients complain about the tracking of emails on Dynamics 365.

As you all know - tracking is set through the Dynamics 365 App for Outlook.

Suppose one of the users track the email from Outlook then rest of the emails within that chain will be tracked to "account, contact, opportunity" etc..

What is smart tracking?

According to Microsoft MSDN documents:

"When an incoming email message is processed by the Email Router, the system extracts information associated with the email message subject, sender address, and recipients’ addresses that link the email activity to other Dynamics 365 for Customer Engagement apps records. This correlation process, also known as smart matching, uses the following criteria to match received email message information to email activities:

Subject matching. Prefixes, such as RE: or Re:, and letter case are ignored. For example, email message subjects with Re: hello and Hello would be considered a match.

Sender and recipient matching: The system calculates the number of exact sender and recipient email addresses in common.

 What is the resolution for this not to happen completely?

Its simple let me show you that..
Go to Administration > System Settings > Email Tab > Uncheck the Use correlation to track email conversations.


Then you are good to go.. no more smart tracking, this turn off will be hugely effective when there is sensitive information which might be accessible for other users with in the business.

You can still configure the smart matching expression according to your subject description of your organisations best practices.

I hope this helps

For Microsoft Dynamics 365 Consultancy/Training/Support/Licensing/Web Hosting/Websites
Contact us: https://www.gmrit-solutions.com


Wednesday, 26 June 2019

Microsoft Business Application summit videos


Hi Everyone,

Today i am going to share quick reference to the Microsoft Business Application Summit 2019.

Most of the Tech enthusiastics want to see all the coverage of the Microsoft Business Application Summit.


Here is the link where you don't miss single session..

Microsoft Business Applications Summit

https://powerusers.microsoft.com/t5/MBAS-Gallery/bd-p/PA_MBAS_Gallery?filter=pc_dynamics%20365

I hope this helps.

For Microsoft Dynamics 365 Consultancy/Training/Support/Licensing/Web Hosting/Websites
Contact us: https://www.gmrit-solutions.com


Tuesday, 25 June 2019

Dynamics 365 Customer Engagement Demo Trial Environment with Business Central Trial for 90 Days

Hi Everyone,

As you know creating a trial version of the Dynamics 365 for 30 days from Microsoft Website.

Here is the link for 30 days 


Microsoft recently introduced the trail version of the Dynamics 365 environment 

Here is the link


If you are a Microsoft Partner or Employee of the Microsoft Partner then you can create a demo environment from here.

From July 1st 2019 Microsoft releasing consolidation of the environments


Fill in your work email address and password then you can start creating the Microsoft Dynamics 365 Customer Engagement Trial

Once you have successfully logged in, you will see below screen..


You can set up all the Microsoft Dynamics 365 Stack demo tenent from this place.

Here for this blog post example, i have created Microsoft Dynamics 365 Customer Engagement Environment.

When we create new environment, it will be prompted with your user credentials and good thing is you will get 25 user licenses for this demo environment.

Once you logged in you will see the Dynamics 365 with all the Apps..


What if we  need to create a Business Central Trial Demo for the same customer on the Dynamics 365 Customer Engagement Environment?


Here comes a little trick..

We have to visit the below trail url:


Select the "Business Central " Tile from the screen and give the credentials of the Demo tenant environment.


Once successfully logged in, we can see this below screen with Business Central along all the Customer Engagement Apps..


Now we can utilize this environment for both for Customer Engagement and Business Central Demo for 90 days with out any hassle.

I hope this helps.

For Microsoft Dynamics 365 Consultancy/Training/Support/Licensing/Web Hosting/Websites
Contact us: https://www.gmrit-solutions.com